|
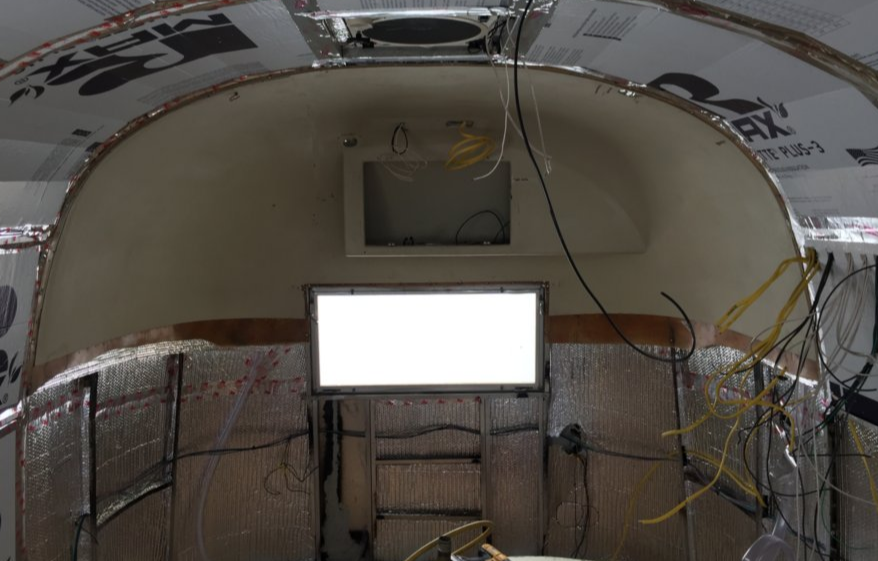
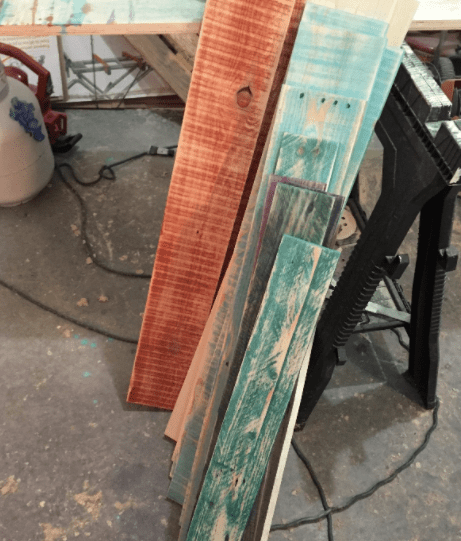
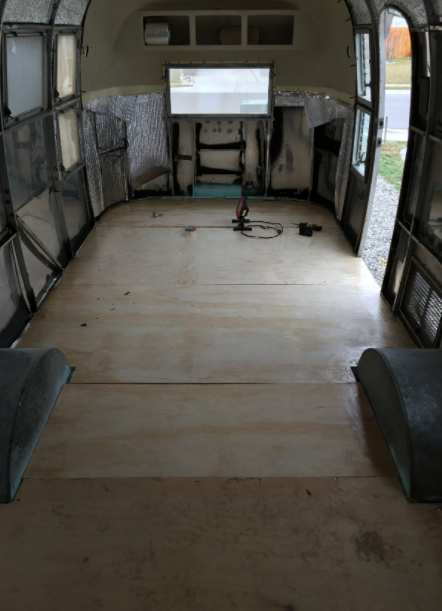
If you are a pro, look away now. This post is about exactly the type of thing that the pro's don't do. I'm very happy with my work; it looks clean and new and very comfortable. But if you are a professional restorer, you know what's coming and you're shaking your head. I chose to paint the interior, knowingly, brazenly, unapologetically. And I used latex paint. Latex. So the problem is that the "paint" from 1962 is a vinyl product called Zolotone. It is actually a really great product and is the ideal paint to use even today. It is applied with a commercial sprayer in multiple coats of different shades and colors. From about a foot away it looks like a uniform color, but get in close and it is really lots of tiny dots - kinda like a Seurat painting. You know the famous one at the park? Supposedly, one could wash the Zolotone paint and grime came off like eggs on Teflon. In truth, there was some of that effect way back when I first washed the skins before taking them out. I scrubbed pretty hard. But years and years of grime, cigarette smoke, and cooking stained the walls. Some things just can't be undone. The professionals have the equipment, time, and money to restore or respray the Zolatone. I refuse. Next, many amateurs (padawans, if you will) choose to paint with an oil-based paint. There is some anecdotal evidence that oil-based sticks better to the Zolatone. Ppphhhfffftt! Oil-based paints are far more brittle over time and sun exposure affects their color more significantly. I can't imagine putting an oil-based paint into a bouncing-down-the-road, sun-drenched travel-trailer. Instead, I went to my local Ace Hardware and bought the nicest interior satin latex paint I could. (One of these days I need to write a post about Ace Hardware. The store manager once told me, "I feel like I'm part of your project" because of all the help he's give me. It's true.) Anyway, I purposely bought the highest grade of paint (which I wouldn't normally do) and it wasn't cheap. The results are below. 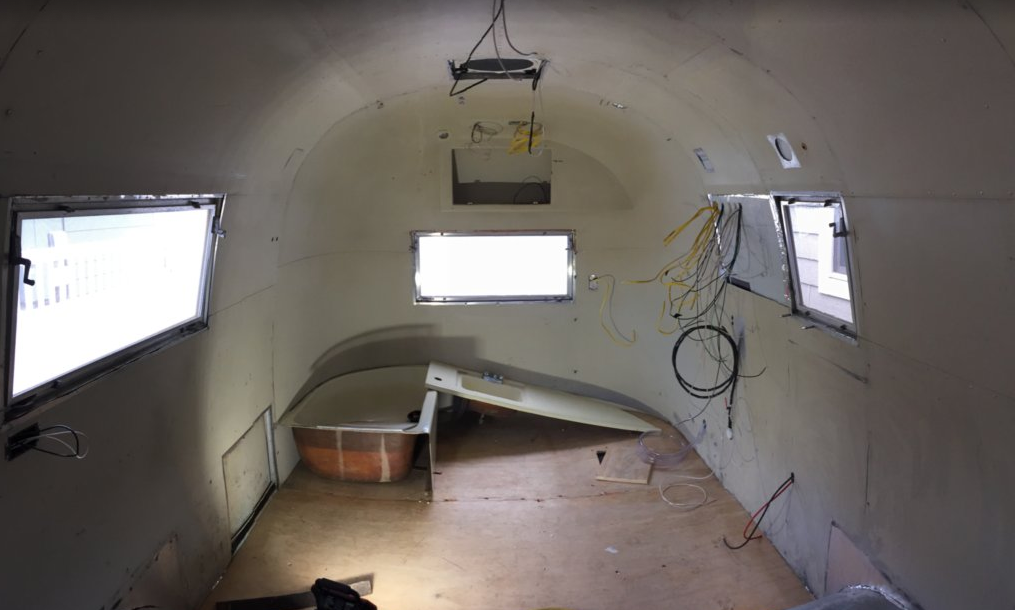 Before. 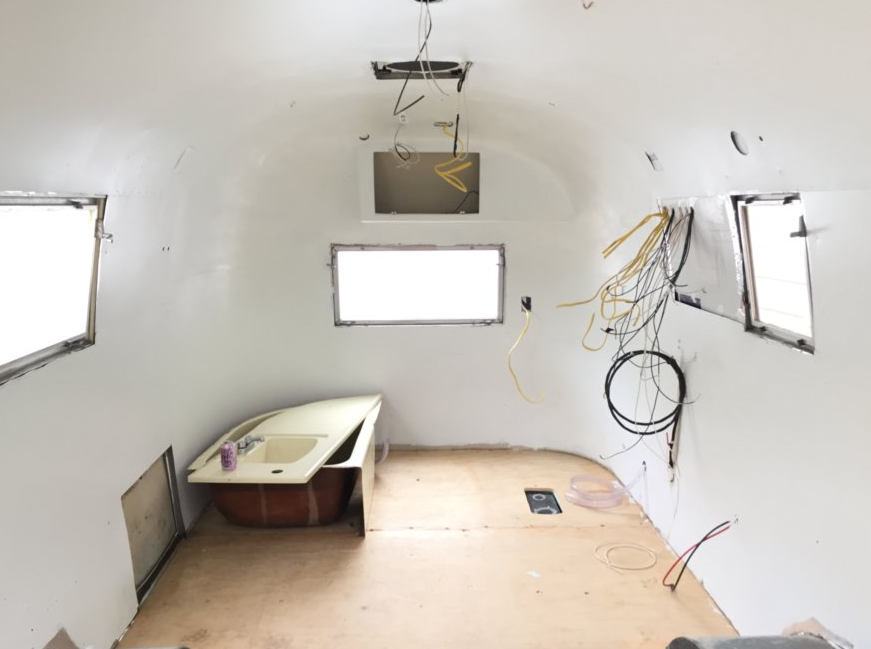 After. Lastly, Eisley is missing from her gravel pad. (Don't worry, it's a good thing.) More on that next time.  Some slob left his garbage in my work site. Oh wait, that was me.
4 Comments
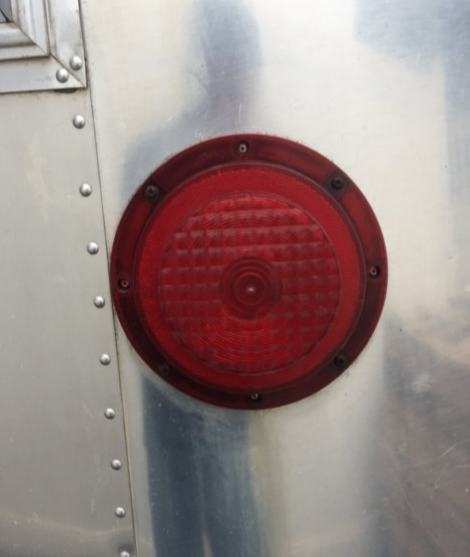
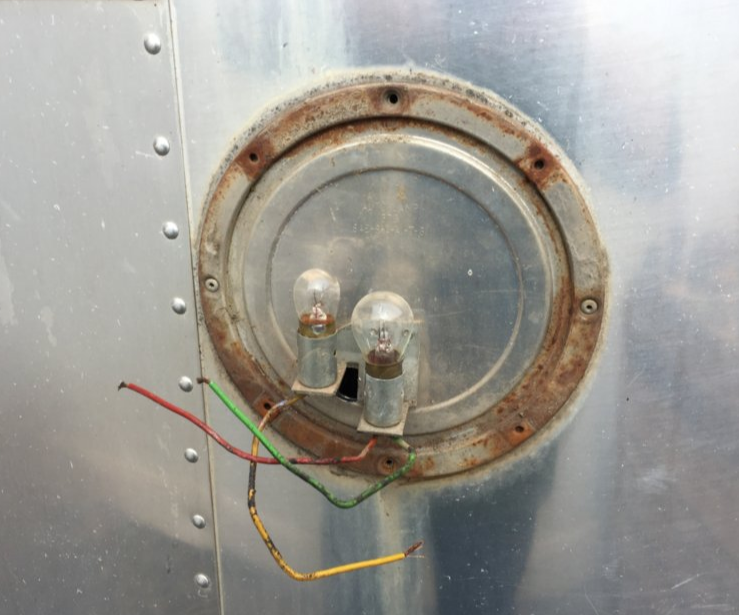
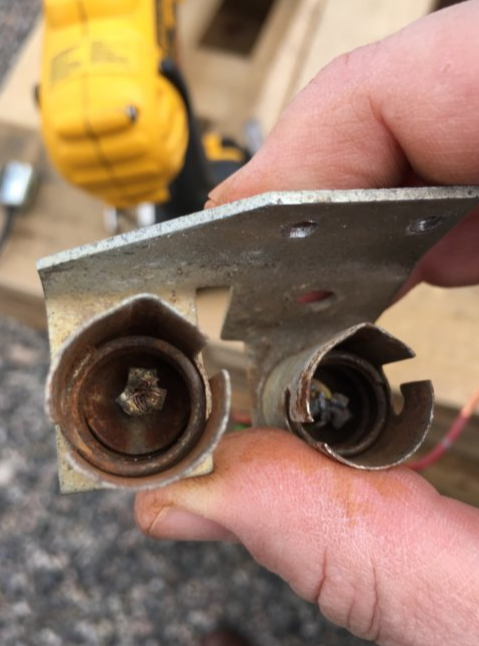
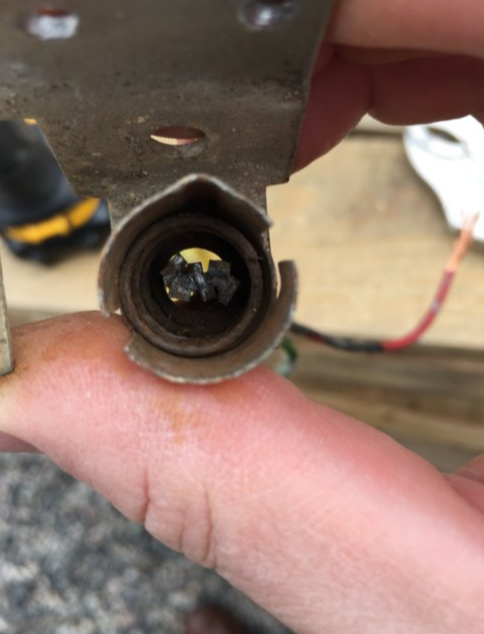
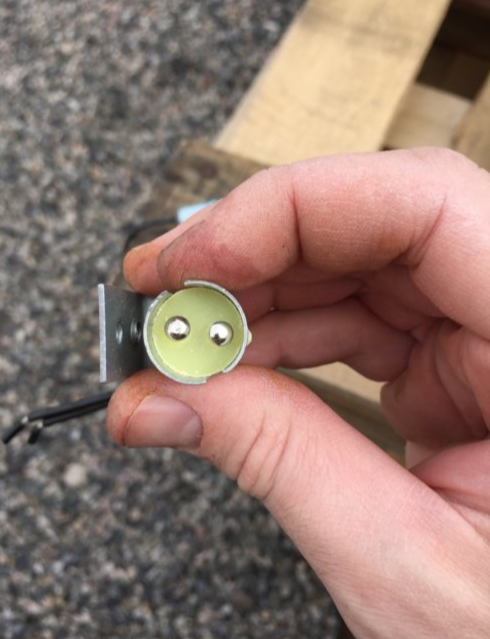
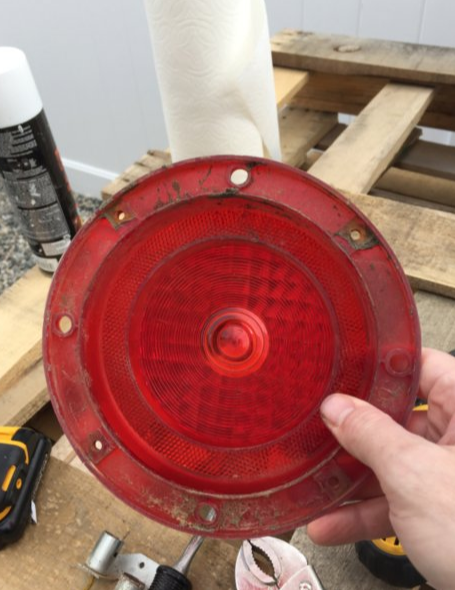
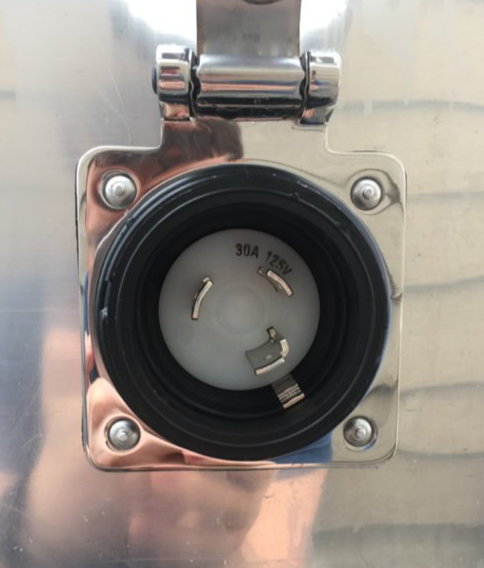
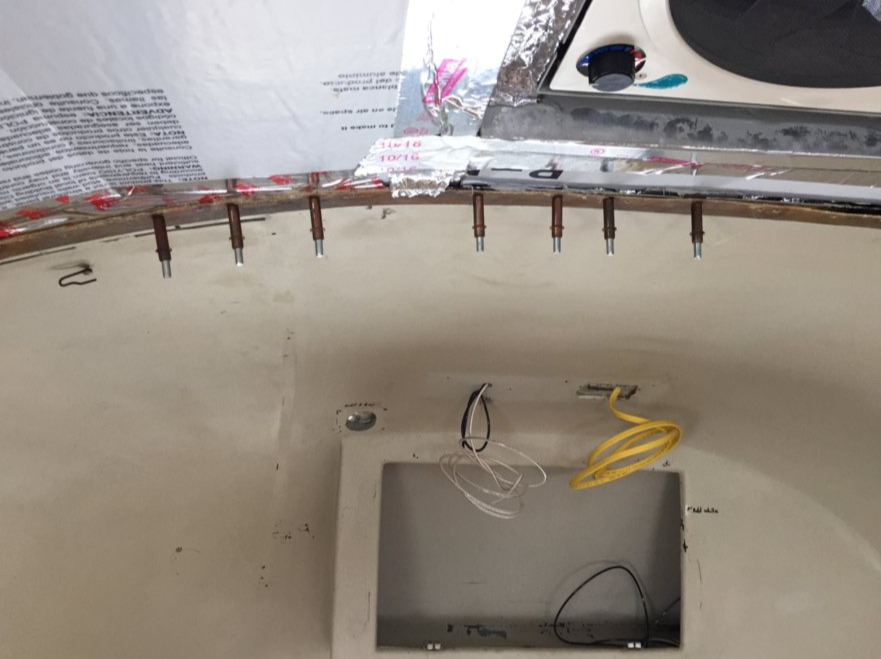
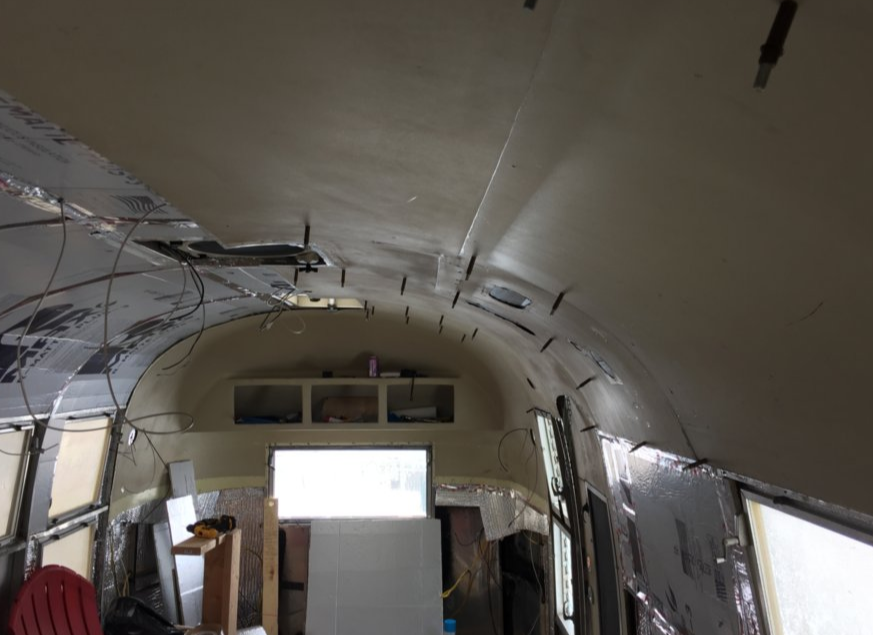
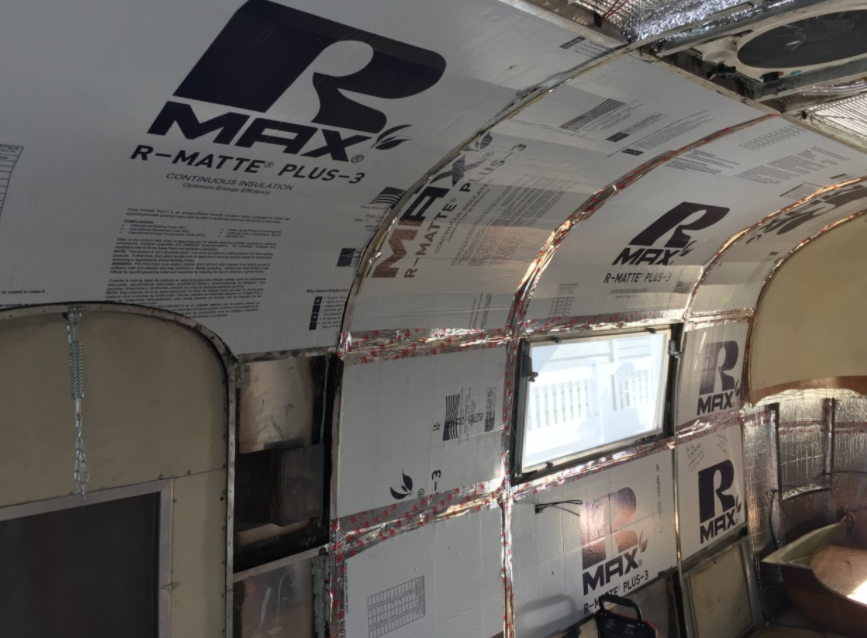
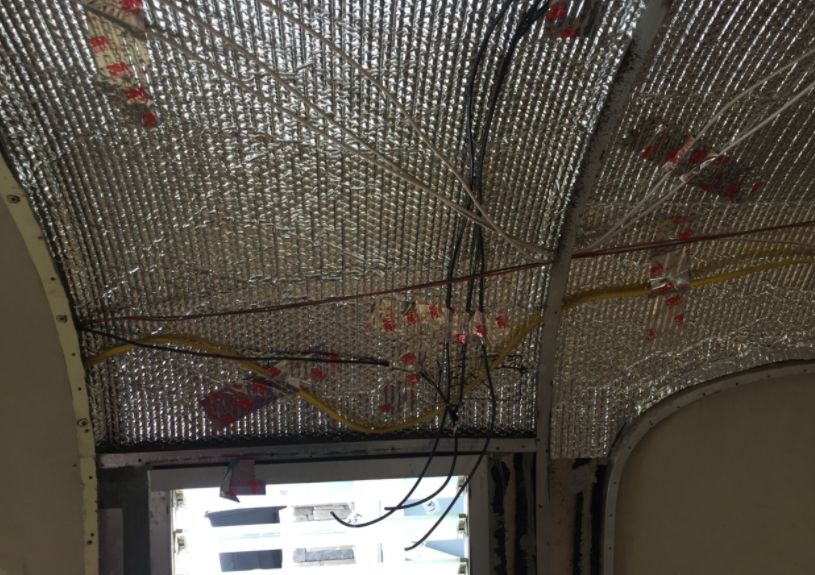
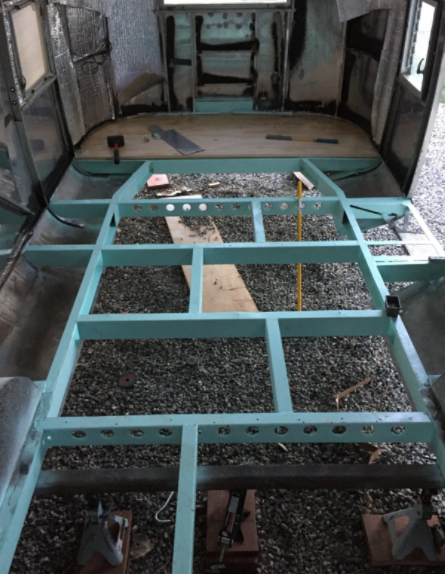
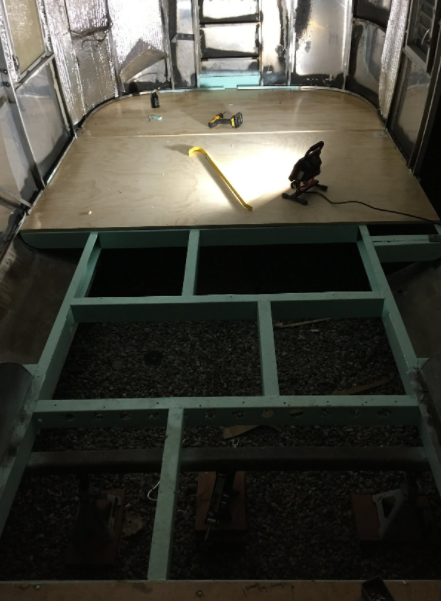
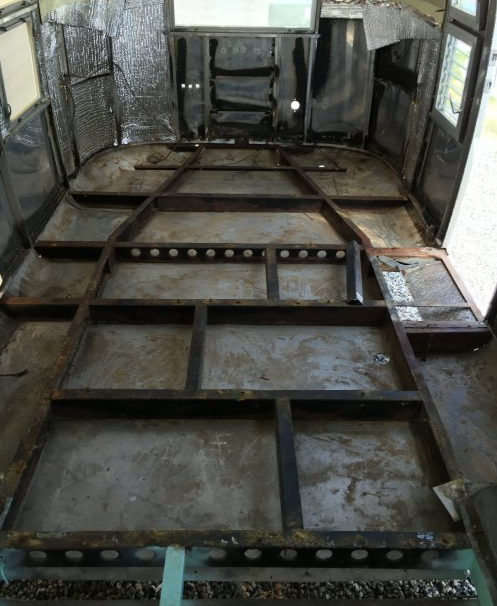
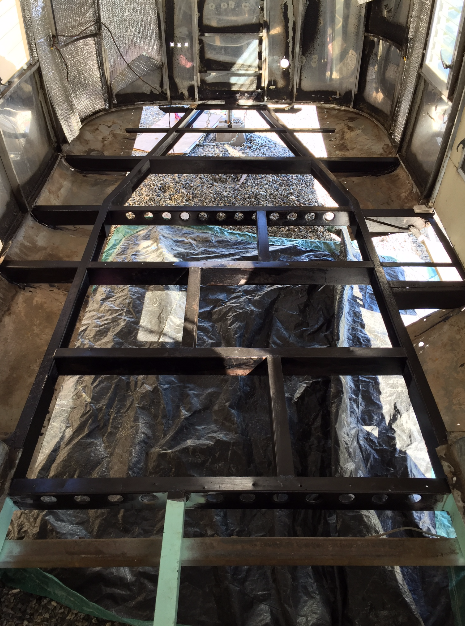
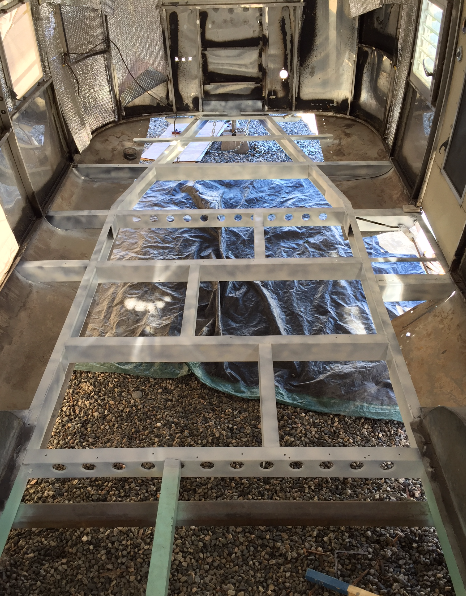
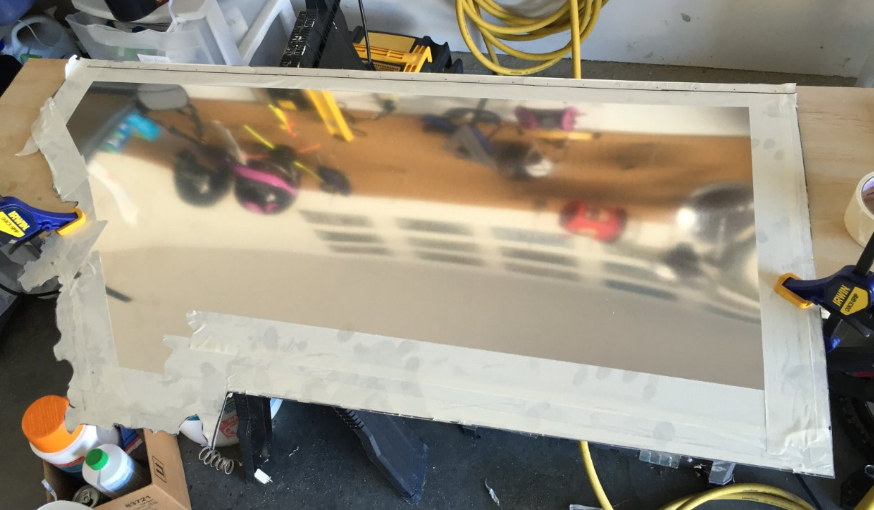
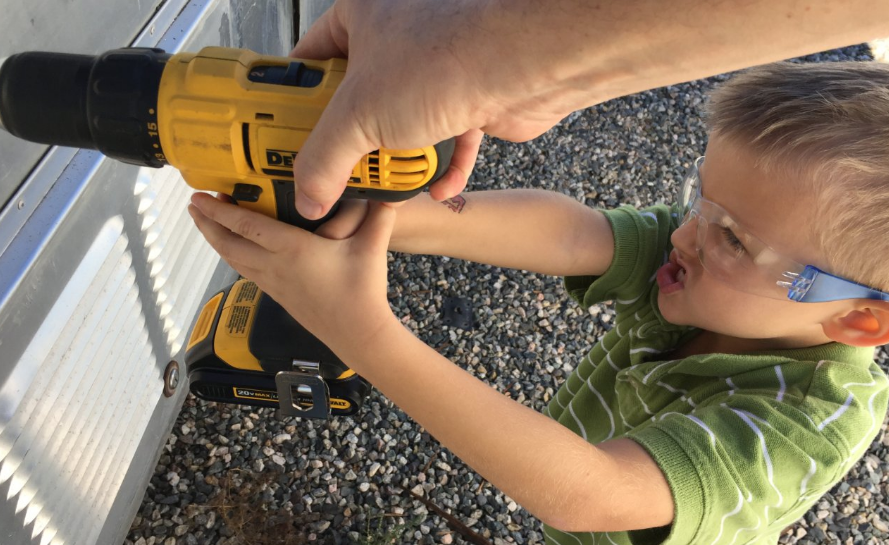
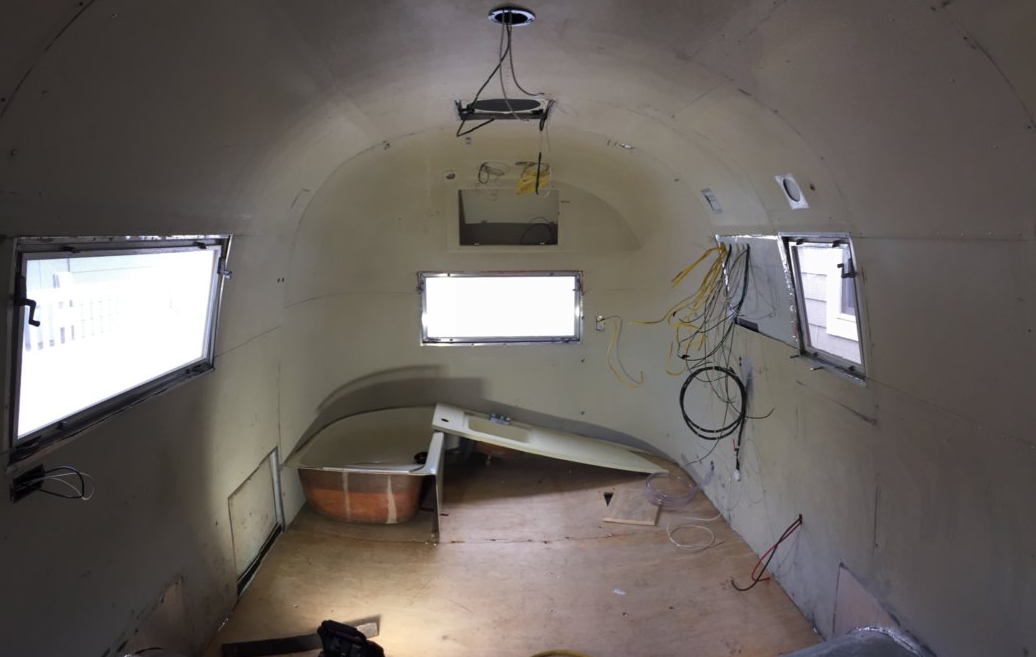 Well, I'm home with a sick boy today and I figured its a good time to update my blog. As you can see above, the skins are in! Yay! It was a ton of work over this month. First, on a nice day I finished bolting the floor down. I bolted the u-channel in the walls to the floor and to the frame wherever possible. Then I used stainless steel screws and repeated the process. Unfortunately, I forgot to get pictures of the process, but I've posted pics before of the bolts. Next, I replaced the brake/running light sockets. They were all sparky and fiery when I hooked them up to power. I can assure you that "sparky and fiery" are not qualities you want in lights. I took pics: I forgot to get pics of them all lit up. Next time around. If you happen to read this because you are restoring an Airstream, know that there is an extra bulb/filament in the tail light assembly. I guess back in 1962, three filaments (in two bulbs) were required. One was the running light, one was the turn signal, and one was the brake light. In modern cars/trailers, the brake light flashes as the turn signal. (When you apply brakes with the turn signal on, both rear lights illuminate and one flashes.) So, I basically played with the filament combinations available until I got one that made the brightness levels about equal. I didn't really need to replace the dual-filament socket with a dual-filament socket, I just did. Next, I installed the socket for the shore power: This is the how electricity will enter the system. It is AC power- the same type as a standard household circuit. The difference in how the plug looks is that it accepts up to 30 amps. The typical household outlet is 15 amps. The difference in outlet/plug means that Eisley can accept more power in than is available through a normal outlet. Think of it like a garden hose versus a firehose (though not so extreme). You can get a ton more water into your system if you're feeding it with a firehose. Just for reference, I think the input into most houses is 200 amps, which gets distributed through your home's electrical panel. Eisley will have a 30 amp distribution panel in the rear closet. Eventually, a converter will take AC power and charge the batteries. Next came the rather labor-intensive and tedious task of finishing the foam board insulation and taping the seams. Finally, it came together with riveting the interior skin back on. You may have noticed that the pics are all from the rear of the trailer. The front skin under the window of the trailer isn't installed yet because there's some buck rivets that I need to install from the outside. But Eisley is ready to roll . . . all the way to the shop to have a new axel installed. More on that next time.
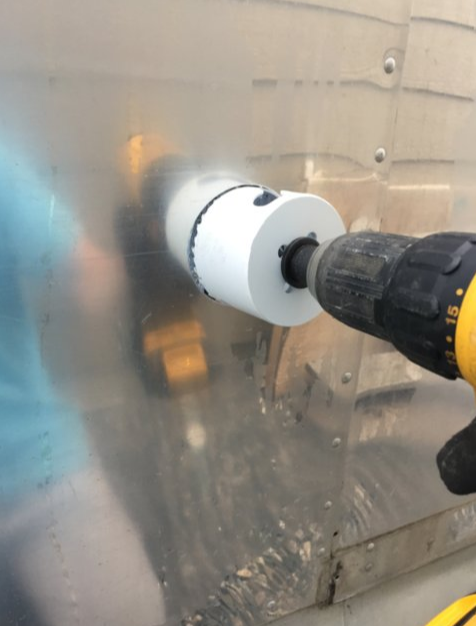
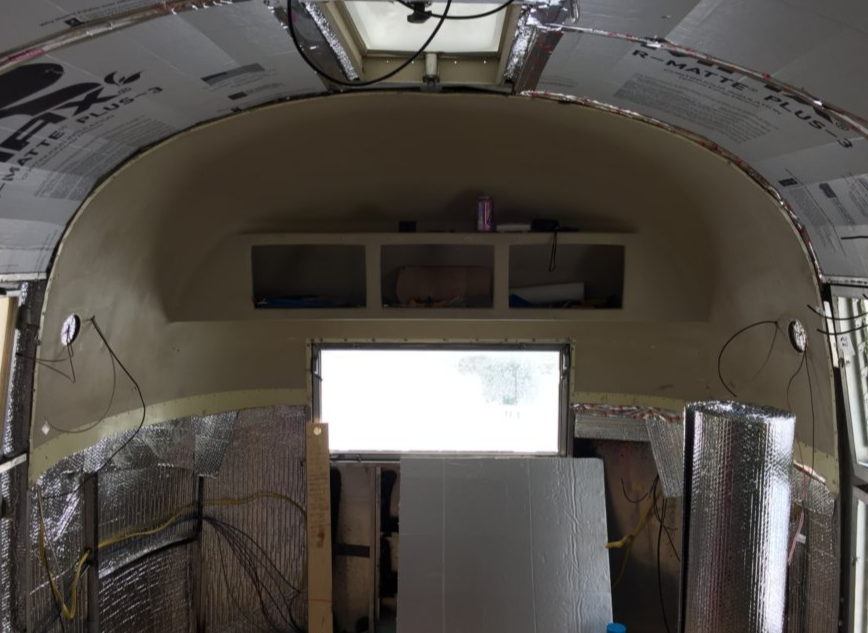
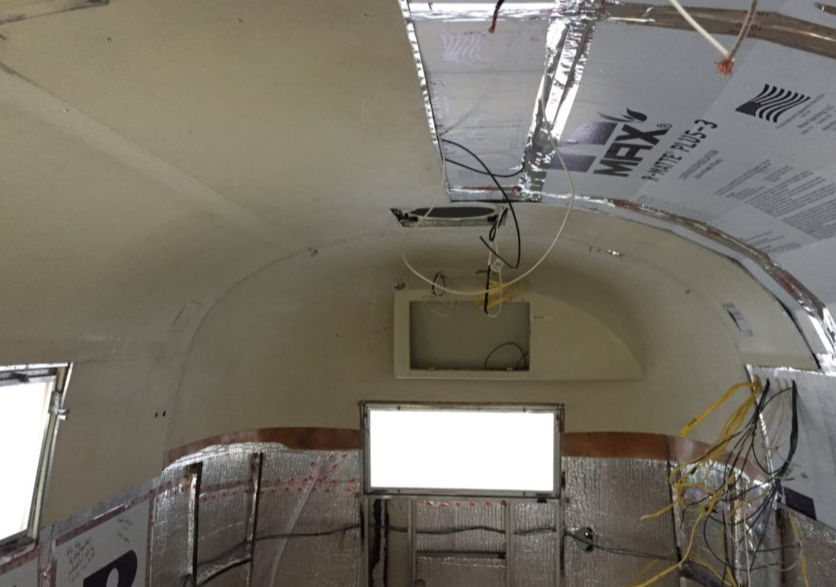
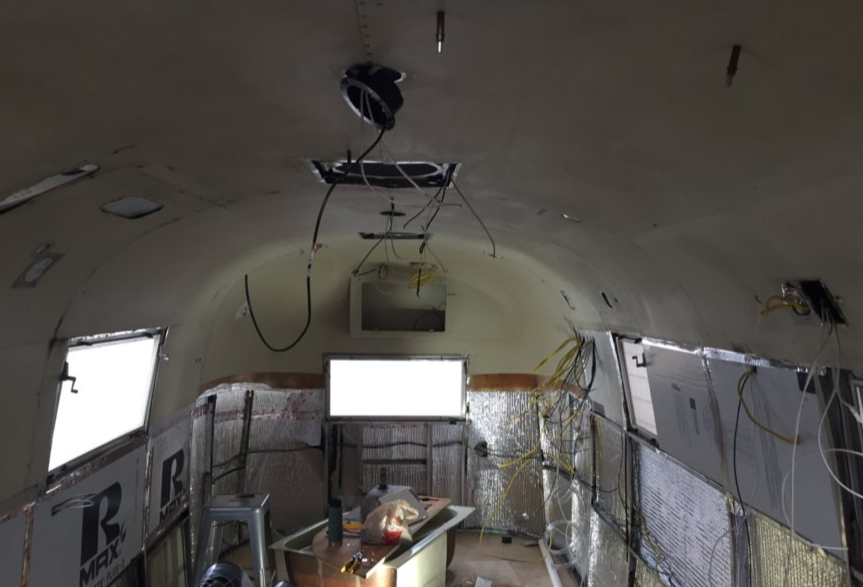
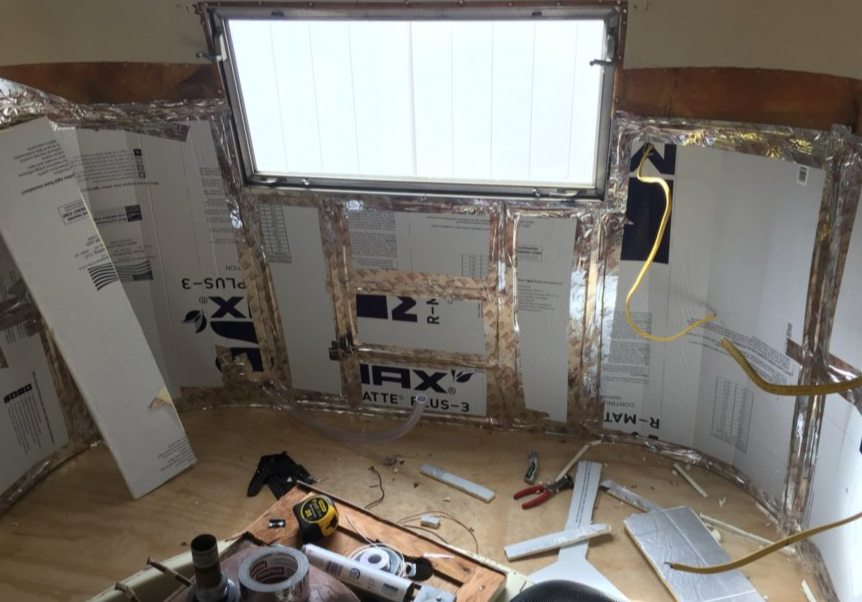
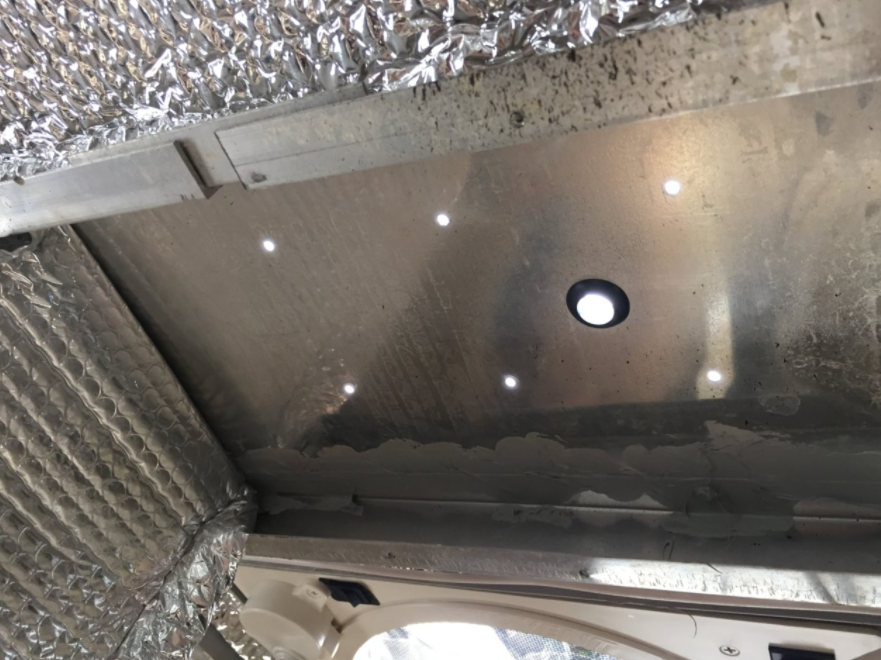
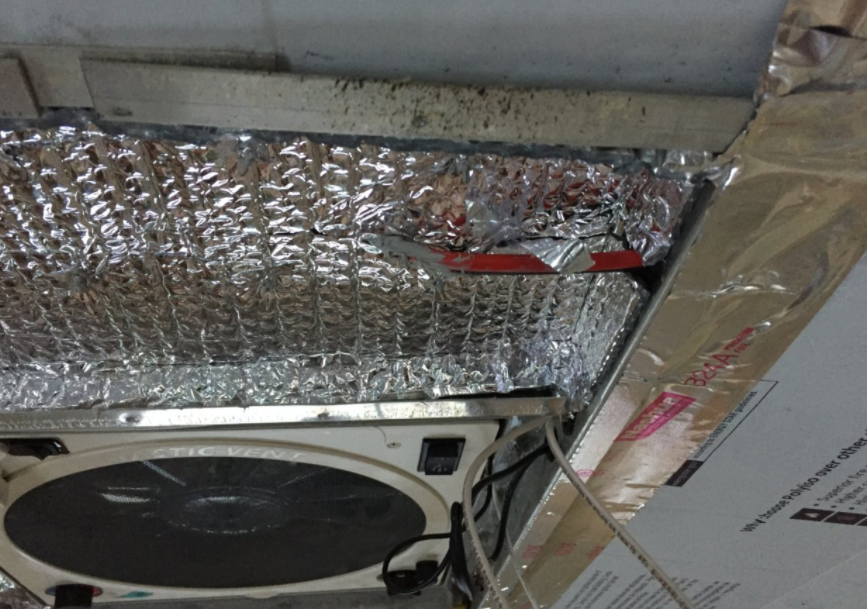
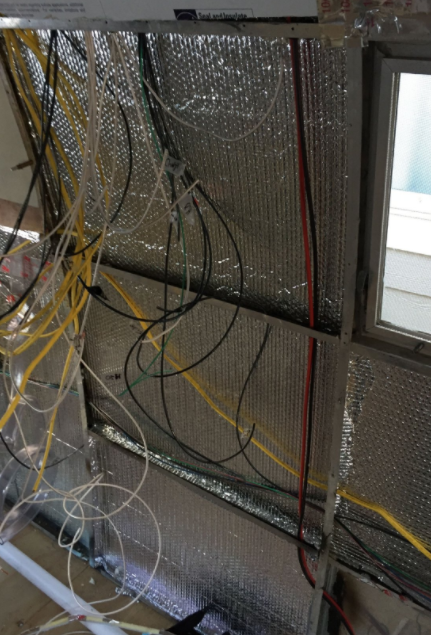
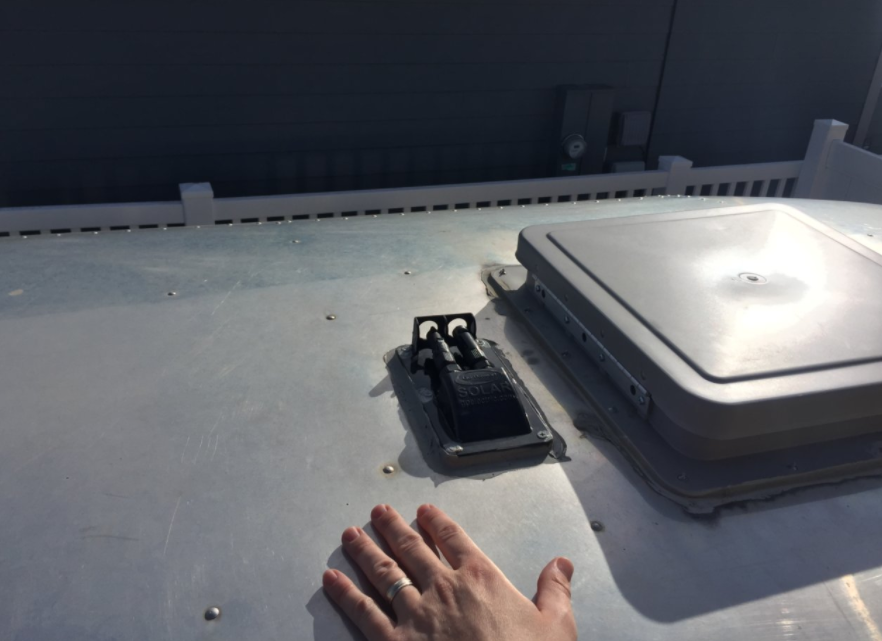
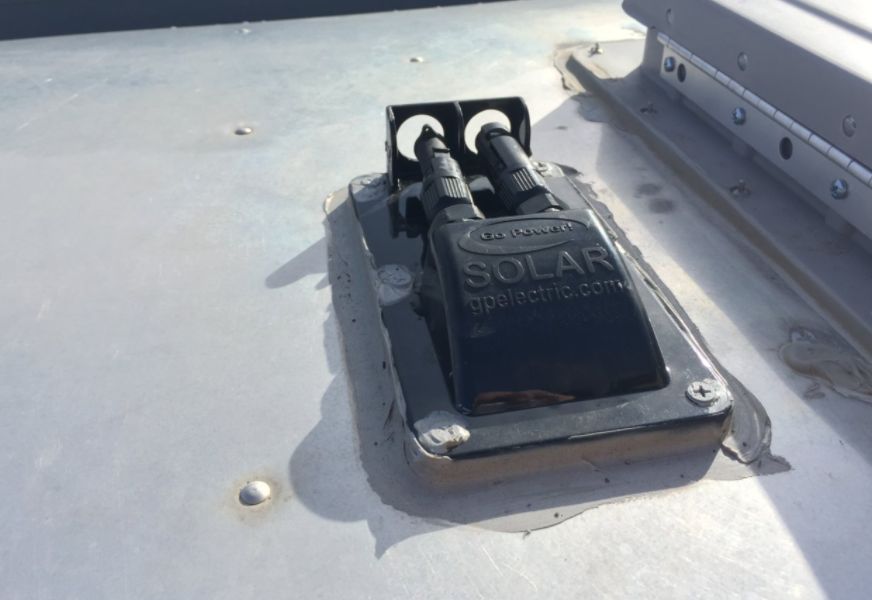
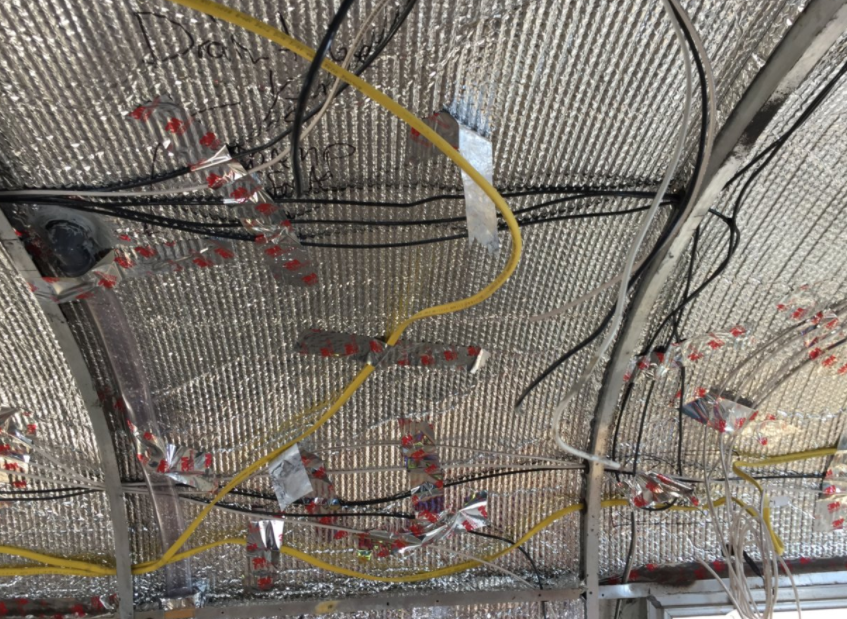
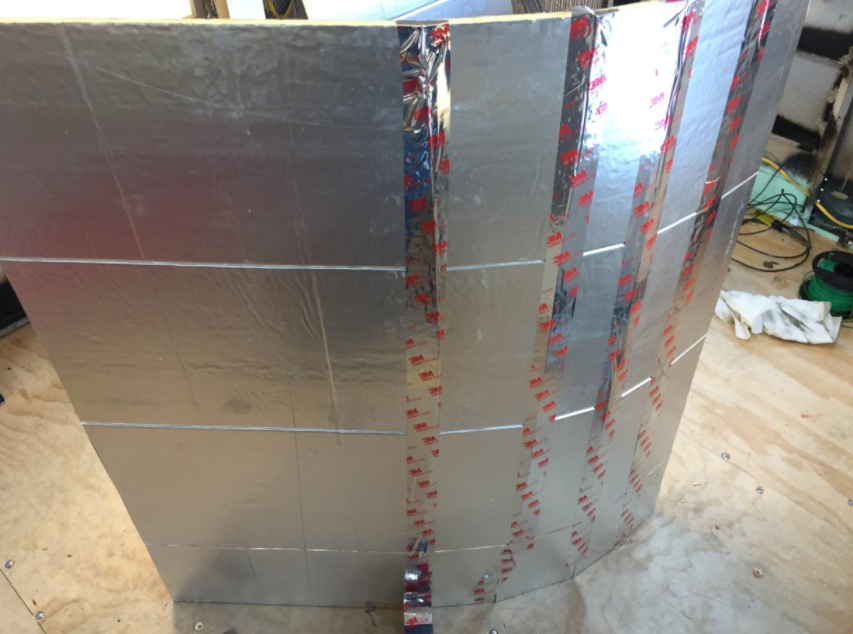
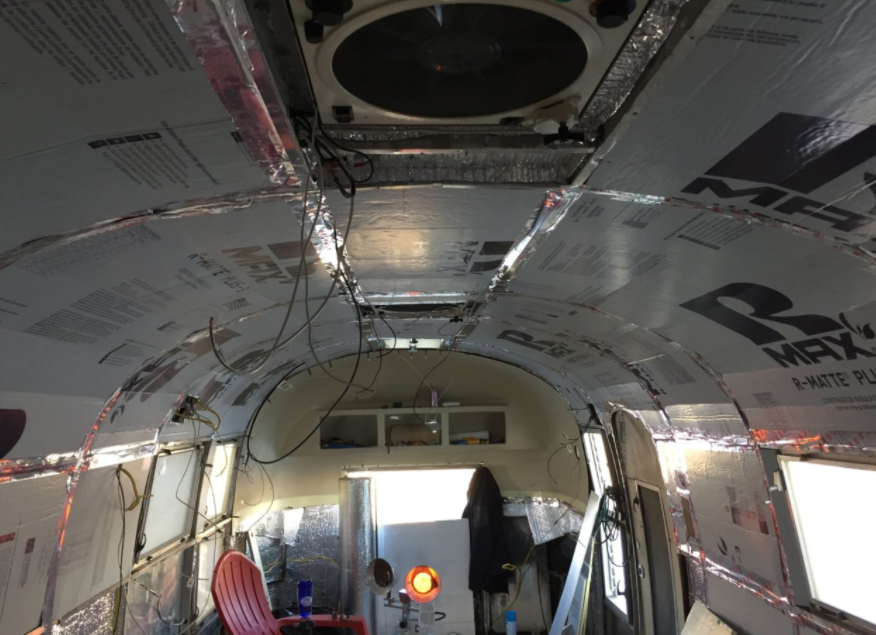
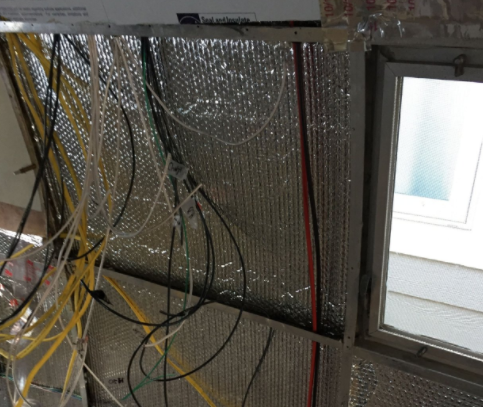
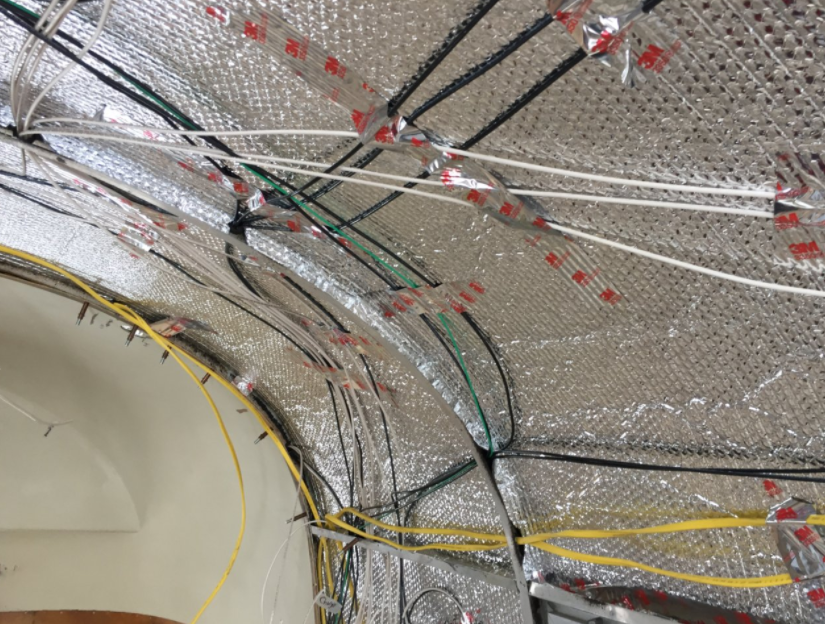
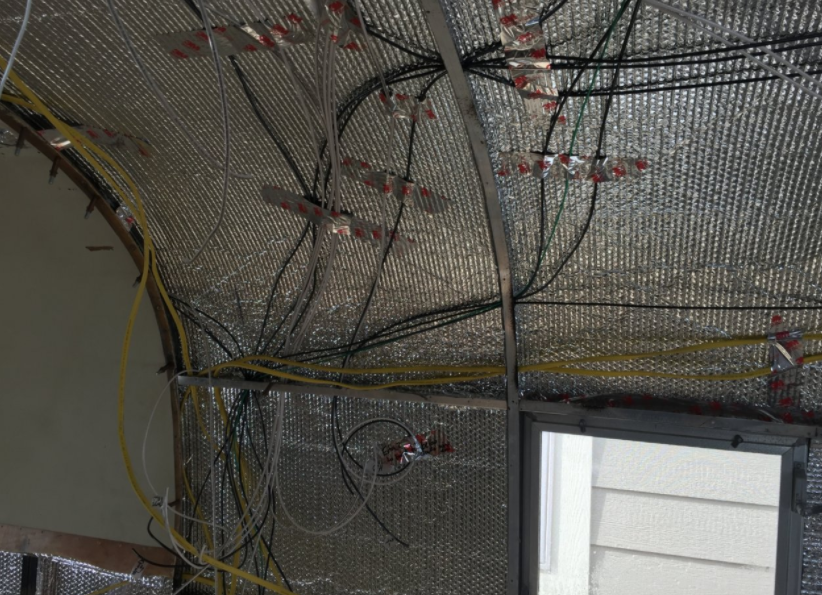
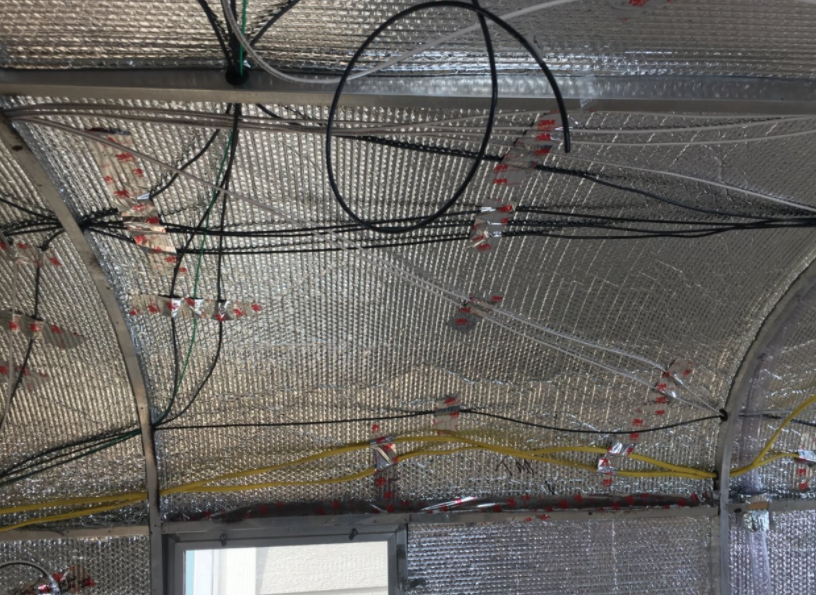
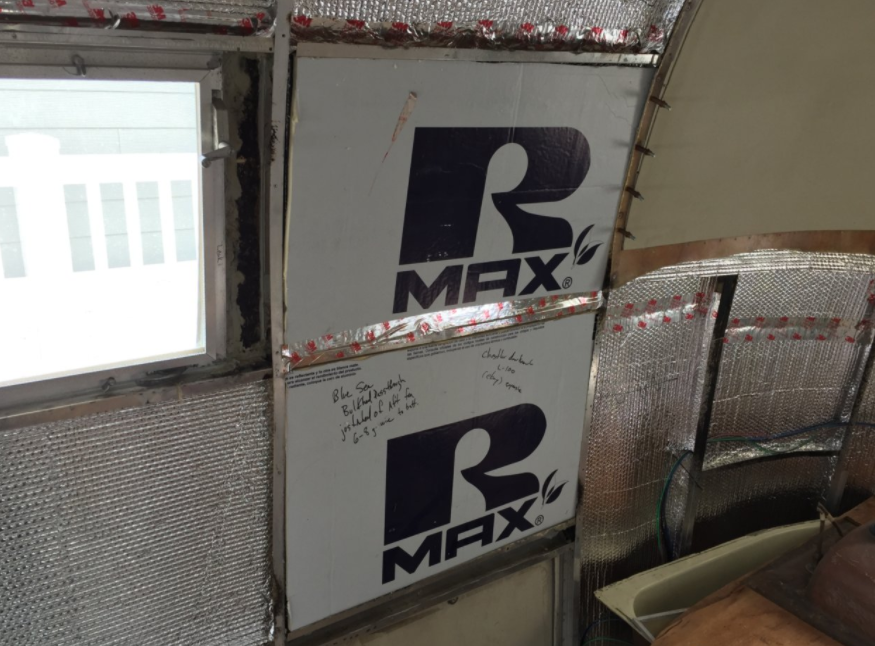
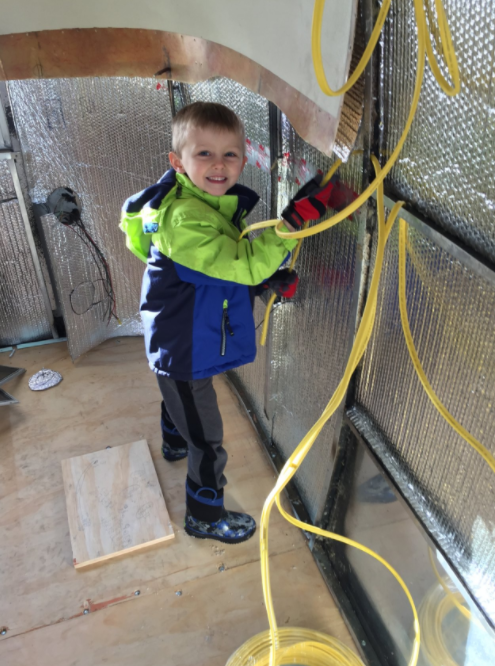
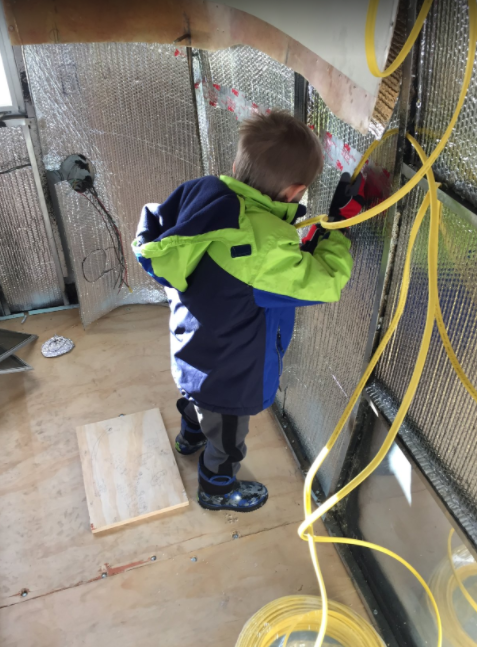
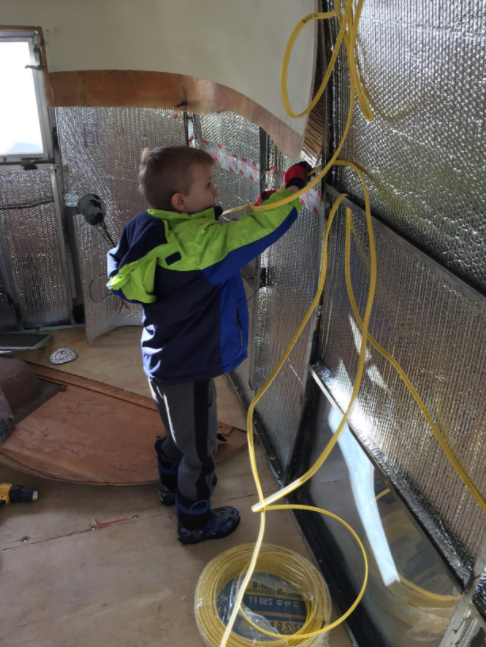
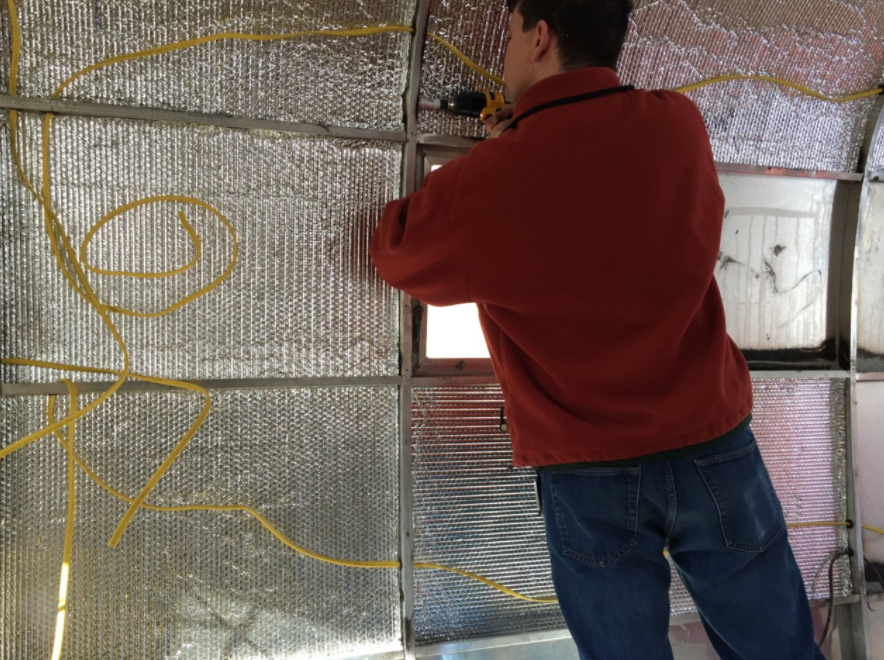
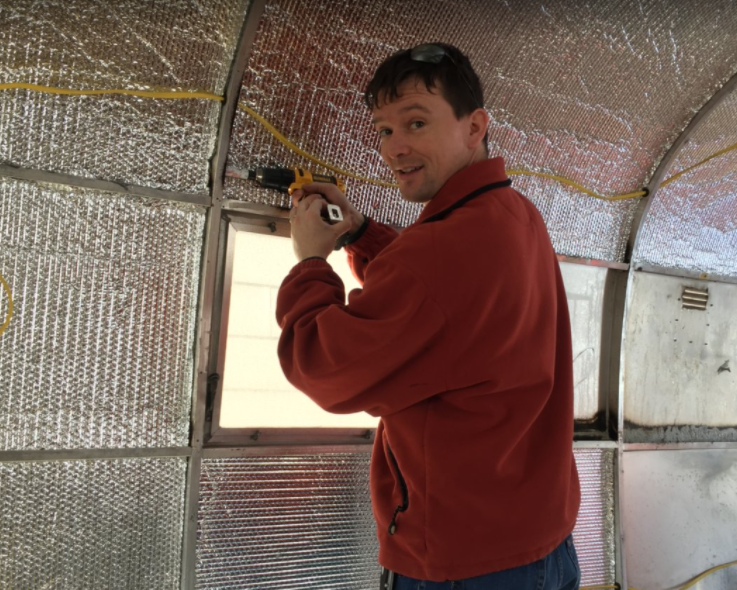
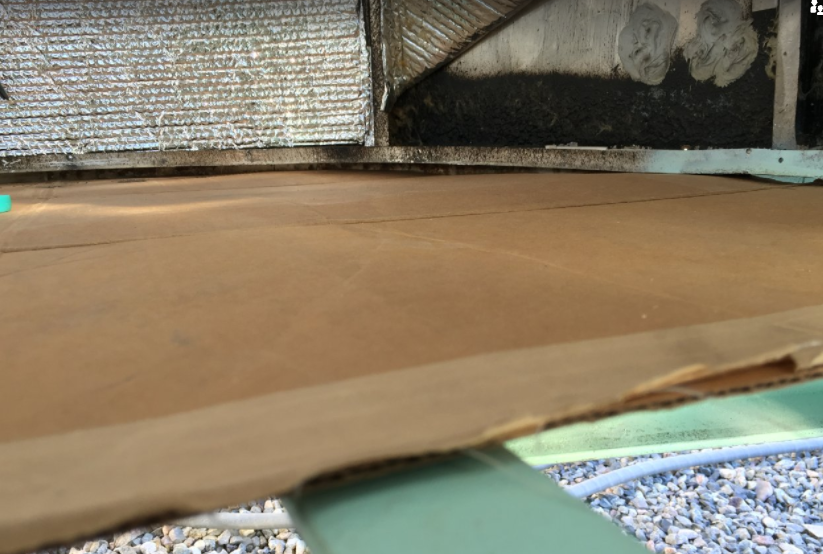
Well, it got cold again here in MT and I didn't have the will to get under the Airstream in 30°F weather a second time. I really need to bolt the u-channel to the perimeter of the floor and frame. Those bolts (and stainless screws) are what hold the shell to the frame. But in order to do that, I need to lay on my back in the snow-slush under the trailer. No thanks, not this weekend. I'm on a deadline now, so if the weather doesn't cooperate, I'll have to do it soon. For right now, I've got enough to work on before that becomes pressing. So, while I wait and hope for a warm weekend, I worked on the insulation and a solar bulkhead pass through. In the photos below, I drilled a small hole in Eisley's roof to allow the wires from a solar array to pass through the shell. Then I installed the pass through and sealed it up. I don't like making new holes in the shell, but I make up for it by really gooping on the sealant. The grey sealant is called "Vulkum" by people in Airstream restoration, but it is really brand-named Trempro 635. It took me a while to realize they are the same thing. Vulkum was the name for it in the days of yore -- which, not incidentally, is where most Airstream restorers seem to come from . . . Then I worked on the insulation. Because I have not bolted the u-channel to the floor/frame, I can't insulate all the way to the floor. The insulation will cover up what I need to do. But, I was able to insulate the entire roof and upper walls! 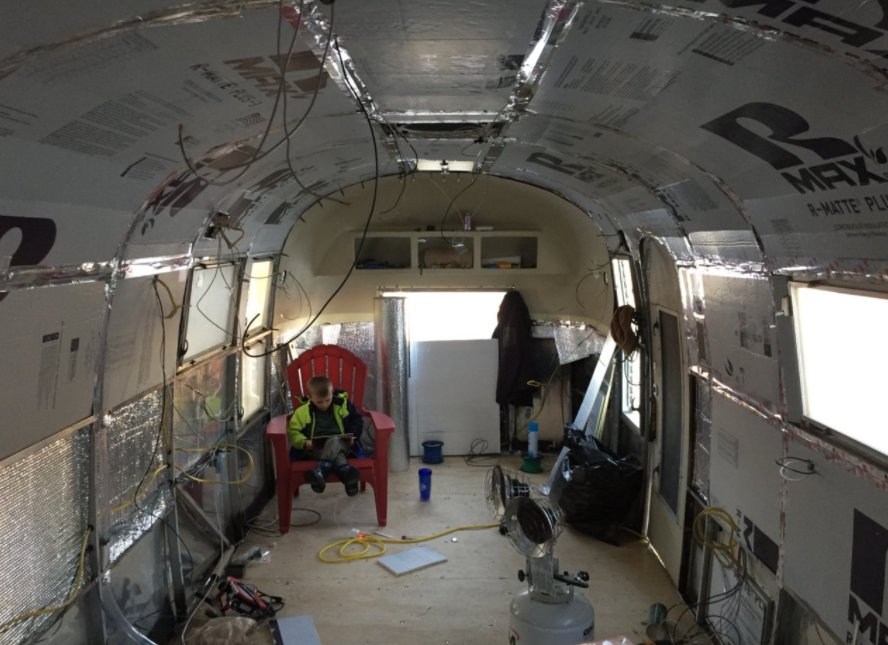 On the lower left side of this pic, you can see the shiny aluminum bubble rap, called Reflectix, that is the outer layer of insulation. The inner layer is R-Max foam board. It has the highest R-value of any material realistically available. Between the Reflectix and the R-Max foam is all of the electrical wiring, the vent tubes and spacers. This creates an air gap between the two insulations that is supposed to increase the efficiency of both types of insulation. Another full day's labor looks like a few minutes of work. One of the fun parts is having my son come play in the trailer when I'm working. Now that all the bad stuff (mouse poop, asbestos) is gone he comes and helps or plays. Today's work was mostly above his head (and mine), so he just played. I'm a little lax with his screen-time minutes in the trailer -- they are normally rationed -- because I like his company. 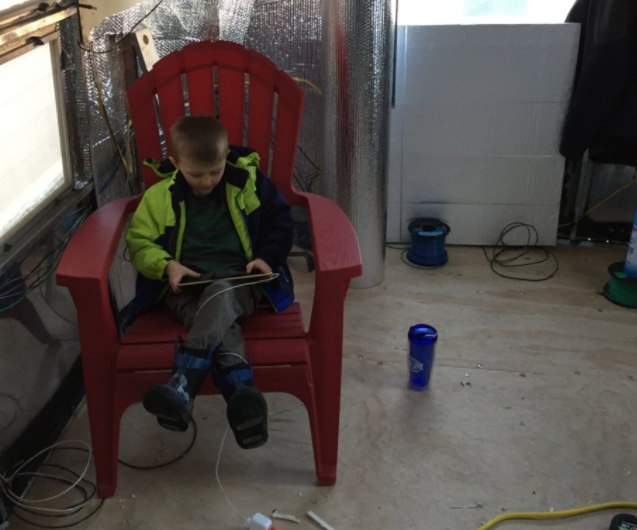 The rough wiring is nearly done! I've got all the wires pulled, taped in place, and ready for the final layer of insulation. I also engineered a new solution for vent stacks from the waste tanks. I put them inside the walls. (I'm sure my friends who are *actual* engineers are cringing right now.) In the post below, I'm going to walk through the electrical choices that I made and I'll explain the new vent stacks. Wiring plans: I ran separate 12V hot (black) and neutral (white) wires for the following circuits. With the exception of the wires from umbilical cord (various colors, see last post) and a line strictly dedicated to the CO/Propane detector (green), all my 12V DC lines are 10 gauge. This is a bit overkill on wire size, but I'd rather be safe than sorry.
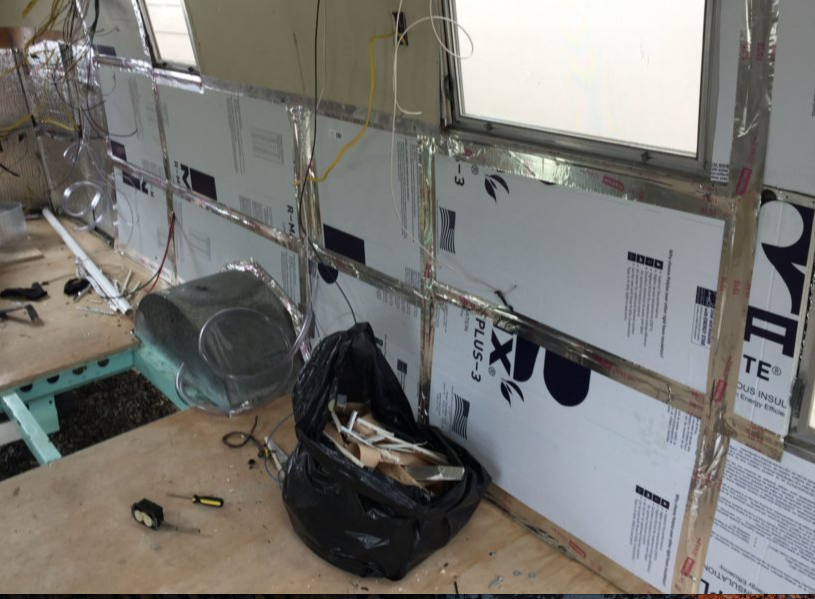
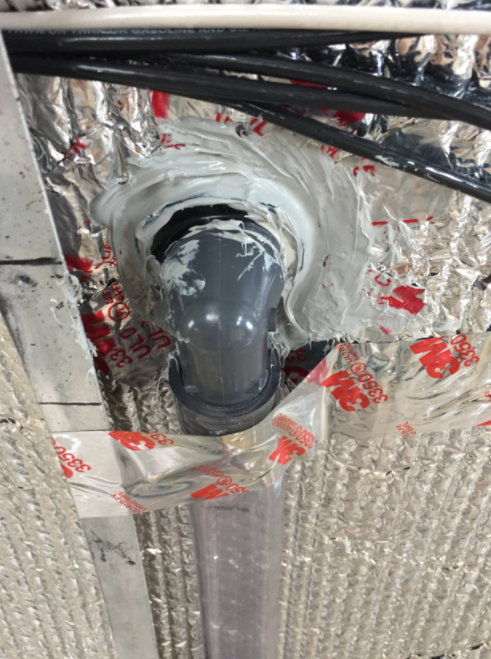
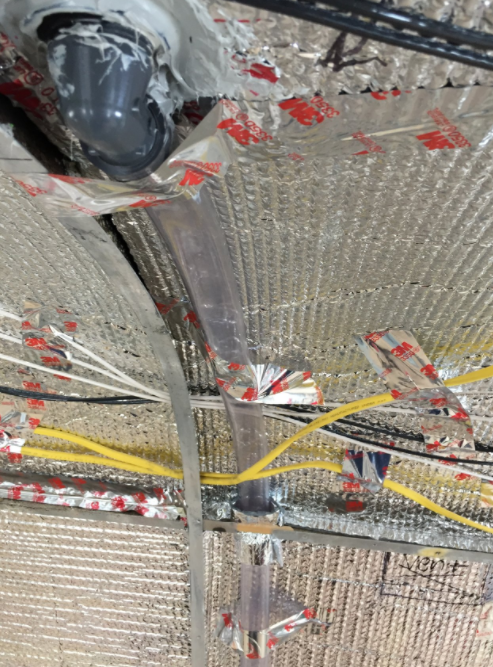
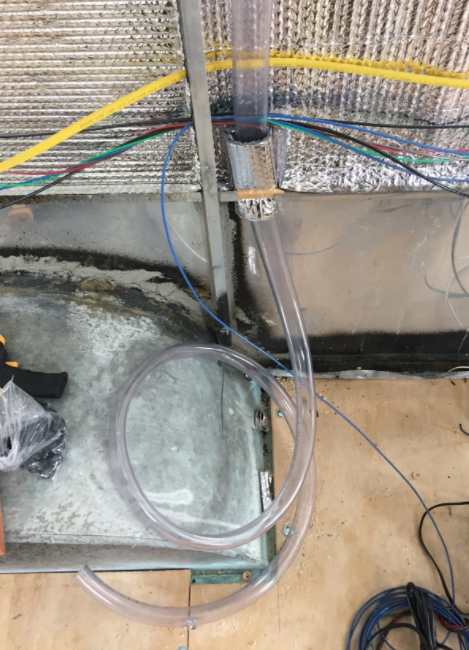
Vent Stacks: There are three vent stacks that exit the roof. These vents allow the waste tanks to vent any built up gasses to the atmosphere. Moreover, in order for the sinks & tub to drain into the tank, the displaced air needs somewhere to go. In 1962, these stacks were hard pipes coming out of the tanks, from the middle of the floor up to the roof. I guess if I was trying to restore Eisley to 1962, I'd need to put them back the same way. That's never been my goal. I think they're ugly. So I bought flexible tube and fittings and buried the vents inside the wall. I used 1" I.D. tube, which should be plenty for atmospheric venting - particularly since this isn't getting the constant use of a home system. I didn't get very good pictures of the vent holes from the inside or the new rooftop covers. The vents will tie into the plumbing system whenever (next year?) I get interior plumbing installed. Lastly, I'm bolting the second half of the subfloor down and installing the final layer of insulation. More to come on that process next time.
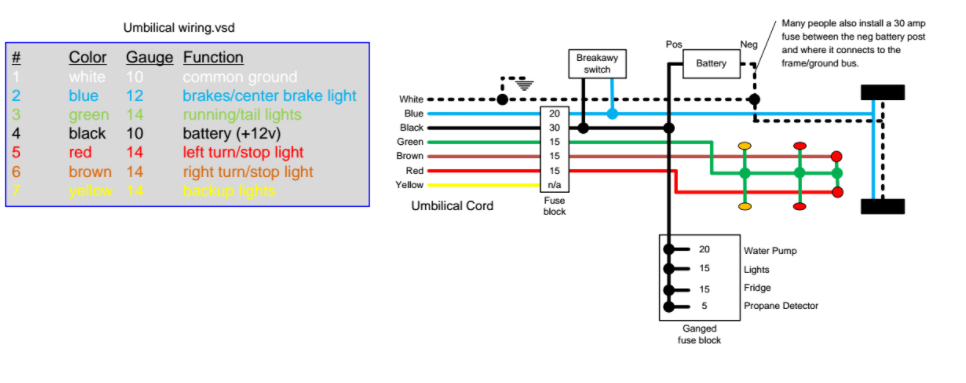
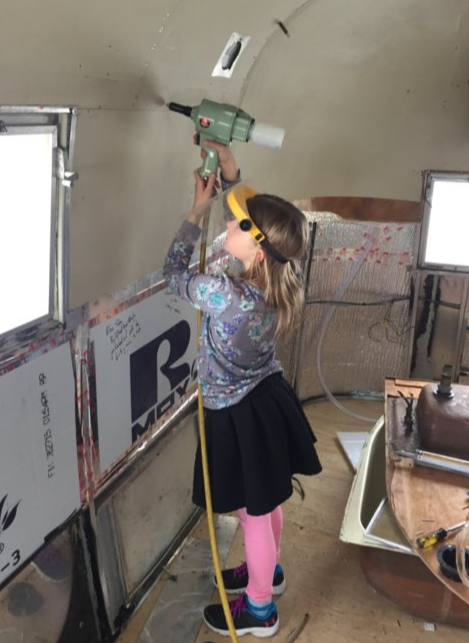
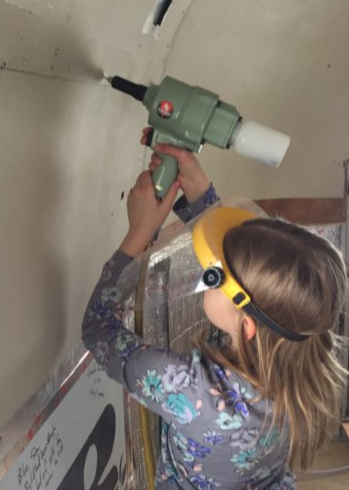
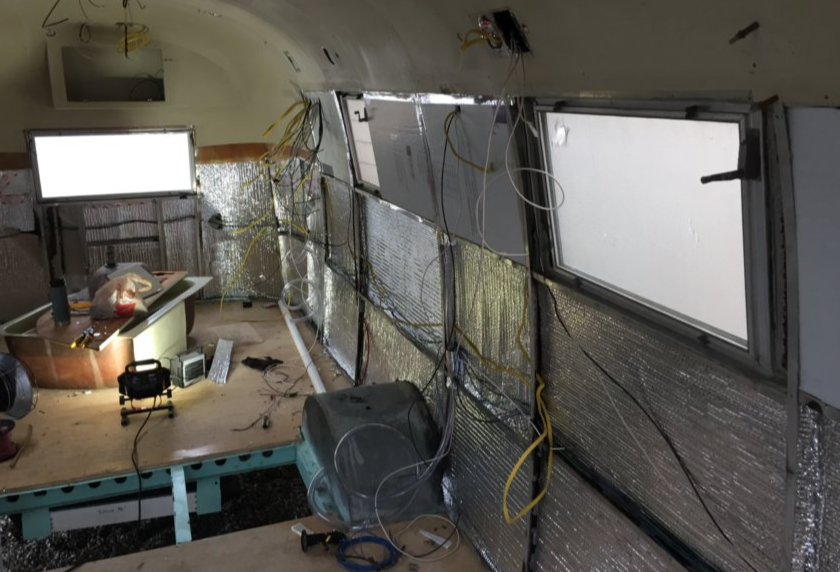
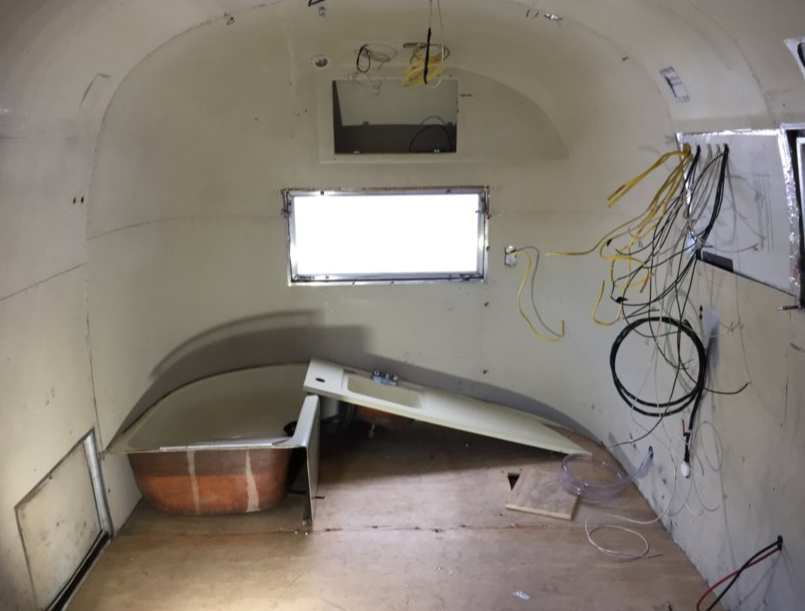
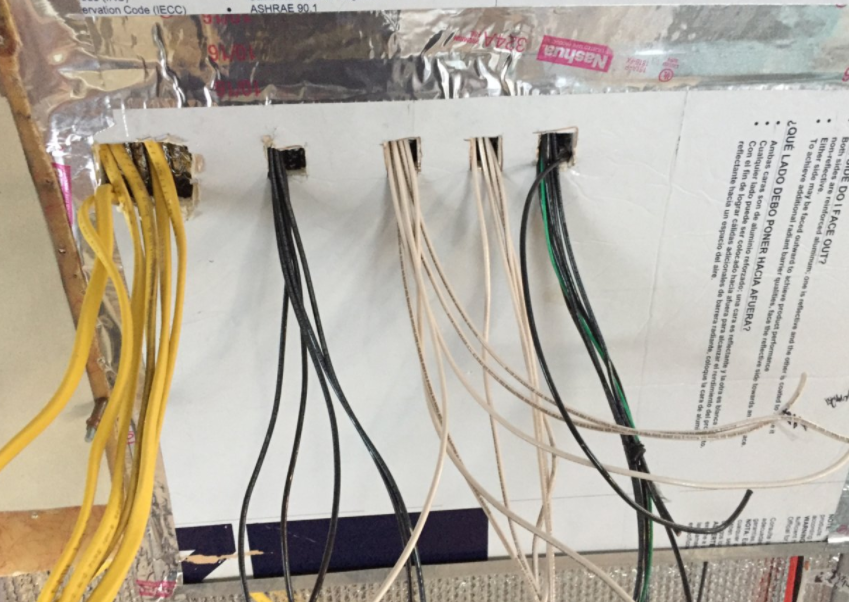
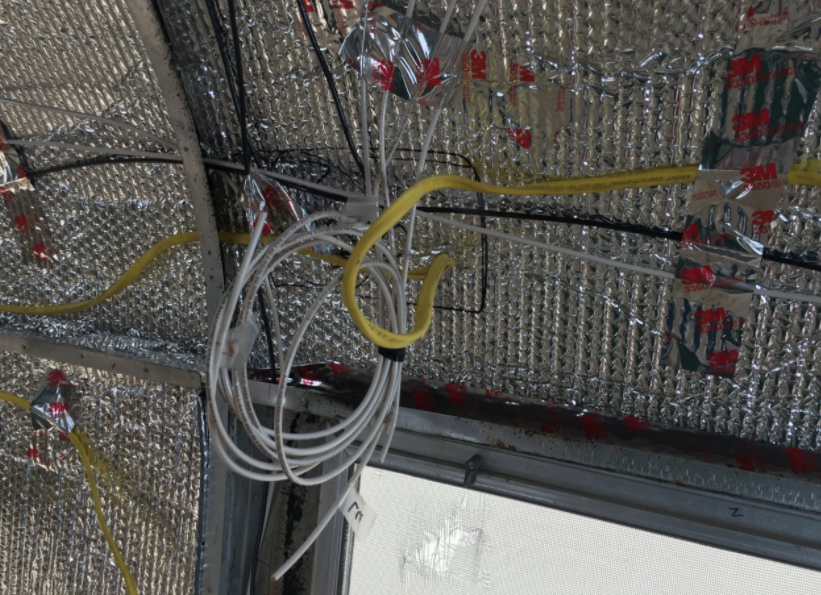
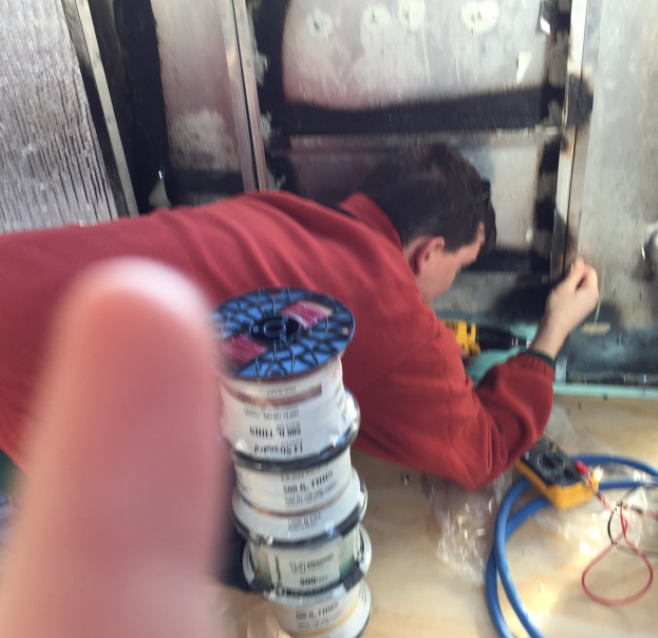
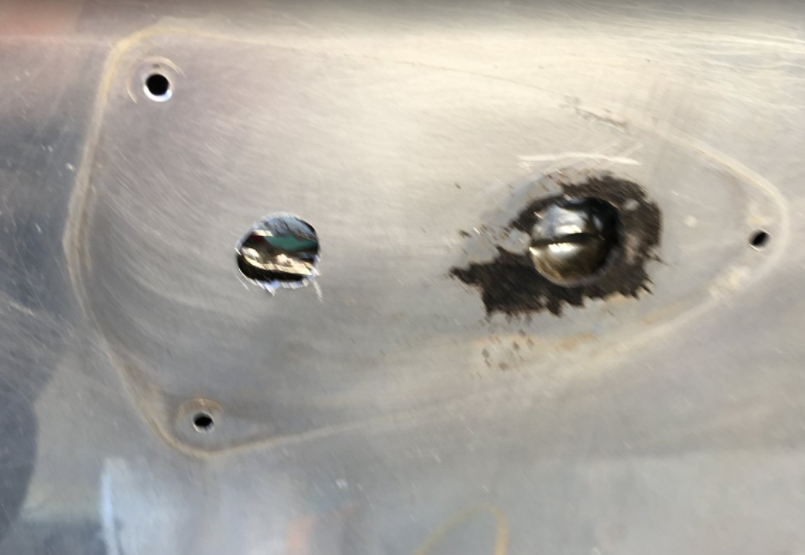
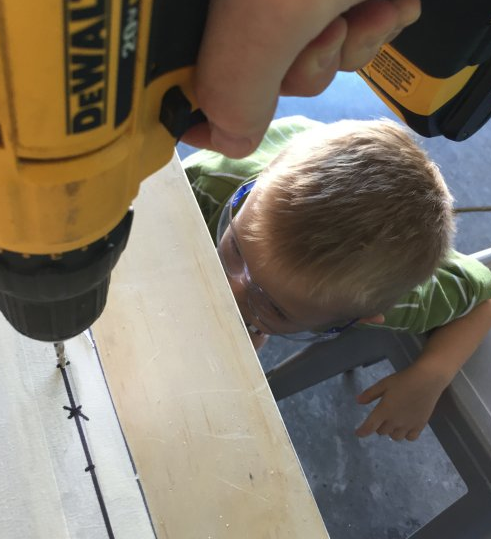
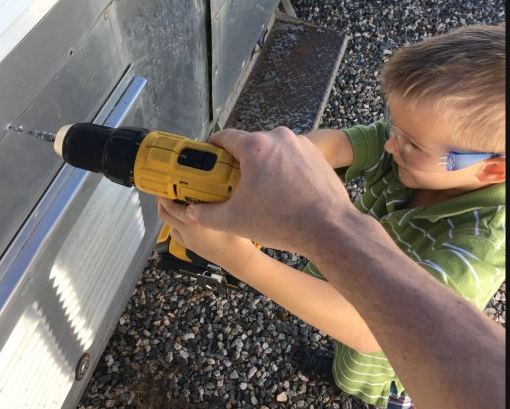
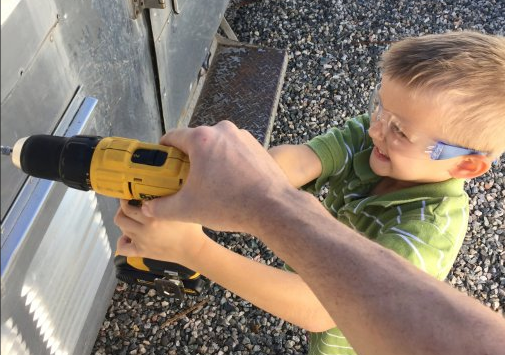
I'm not sure if I've already mentioned this, but I'm regularly surprised at how long every step takes. Sara says this is because I teach 1st grade. Whole lessons can take as little as 8 minutes. The number of unique plans we complete in class in a day usually number well above 10. I started wiring a few weeks ago. In my mind I think, "First step: pull all the AC wire. 20 min. Second step: pull all the DC wire. There's a few more lines to do in DC. Maybe about 30 minutes. Third step: solder and heatshrink. 20 more minutes? So I should be done in two hours, tops." But, I'm still wiring. Anyway, I started by deciding on the best place for the new electrical panel. I decided to put it in the streetside closet nearest the bathroom. However, I haven't bought the panel because I'm planning on buying an all-in-one converter & distribution panel. It's pricy and my budget/savings is getting to the I've-got-to-make-hard-decisions point. We will camp this summer, but probably not with working electricity. 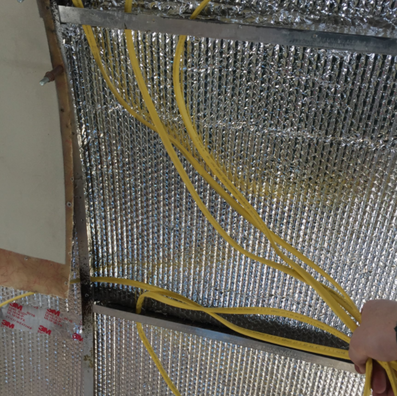 Eventually the electrical panel will mount here. From this spot, my helper and I ran all of the AC wiring. He took a bunch of photos of me too: Basically, it just takes planning for each outlet/AC line. I planned lines for possible AC outlets, kitchen appliances, bathroom outlets, and an extra line for air conditioning. I'm not planning on putting in an air conditioner (we will mostly camp in the mountains), but I want everything there if I change my mind someday. Then I drilled new holes, installed rubber grommets to protect the wires, and pulled the wire. Next, I moved onto the DC wiring. For those that might not know, Airstreams have two different electrical systems. Alternating current or AC (all the yellow wires above) is your typical house current. It only works inside the Airstream when plugged into shore power - like at a house or RV park. On the other hand, direct current, or DC, is essentially battery power. There will eventually be two deep-cycle AGM batteries that power the lights, water pump, assorted appliances, safety detectors, etc. Most of the electrical functions of the trailer will run off of DC power. A charger that runs off AC will recharge the batteries once they get drained. In addition, there is an umbilical cord that runs from the tow vehicle to the trailer that powers and controls all of the running lights, brake lights, and turn signals. I started by rolling all the spools of wire randomly around the trailer. It turned out that dealing with 6 spools of heavy wire requires a system. So I built a little cradle. 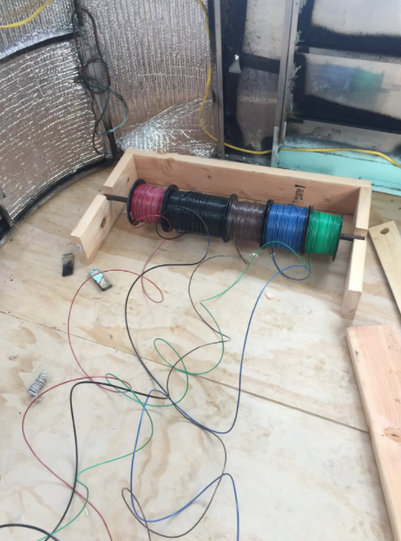 Each of those wires is a different color for a different function. In addition, the some are different gauges:
 I got this diagram somewhere on the internet long ago. Probably on www.airforums.com. I couldn't find the source or I'd have linked to it. 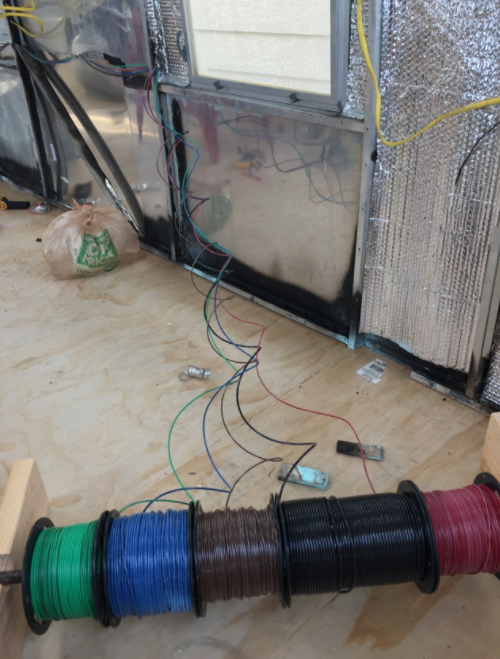 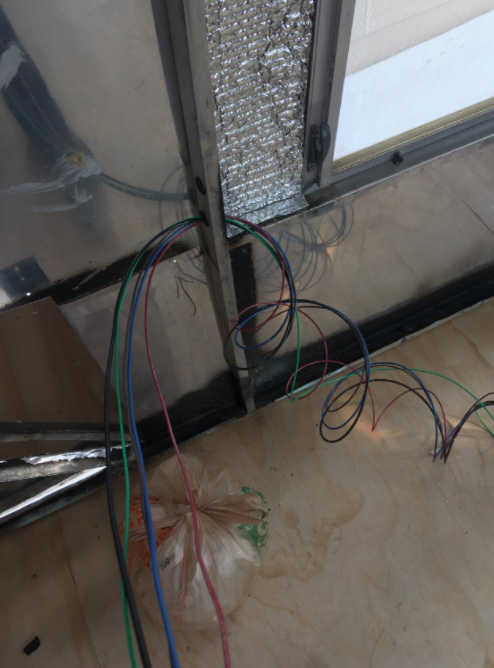 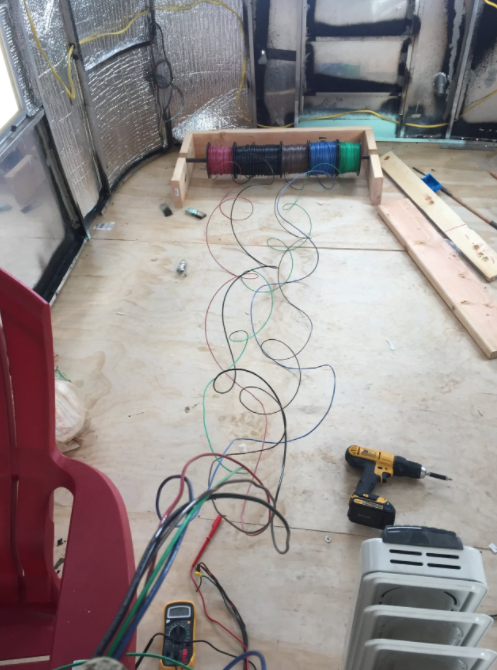 So that's where I'm at. I assure you that it's taken me longer than two hours. I think I'll be done with running wires, soldering and heatshrinking in about 45 minutes.
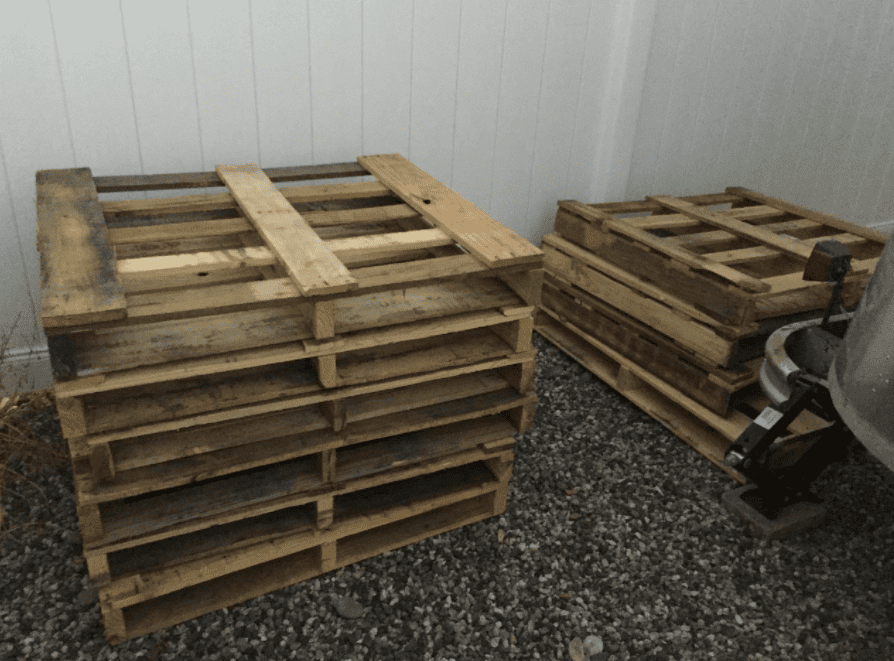
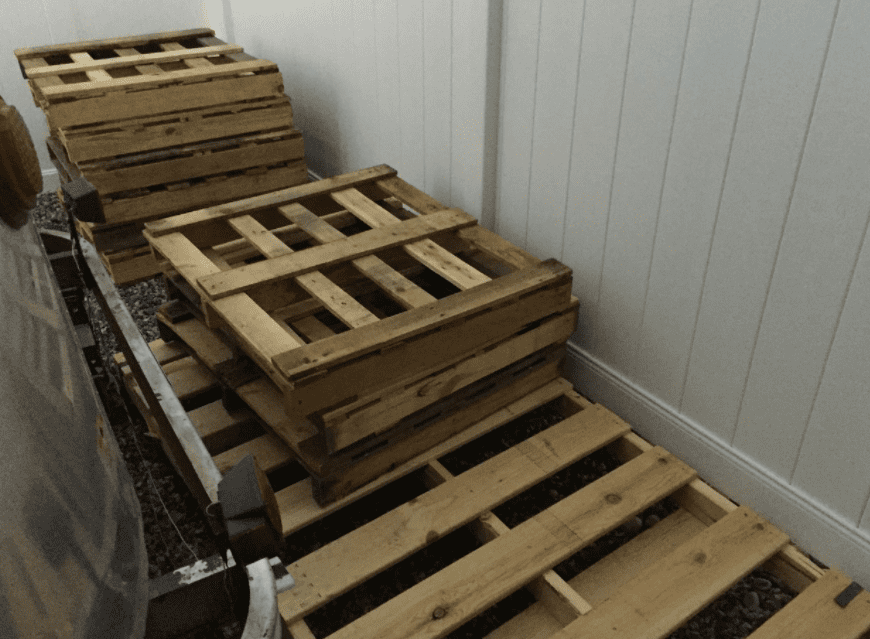
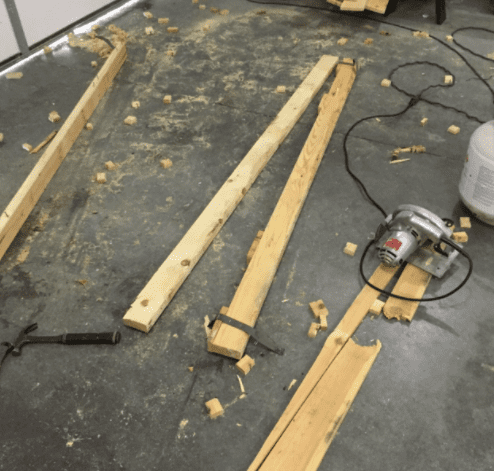
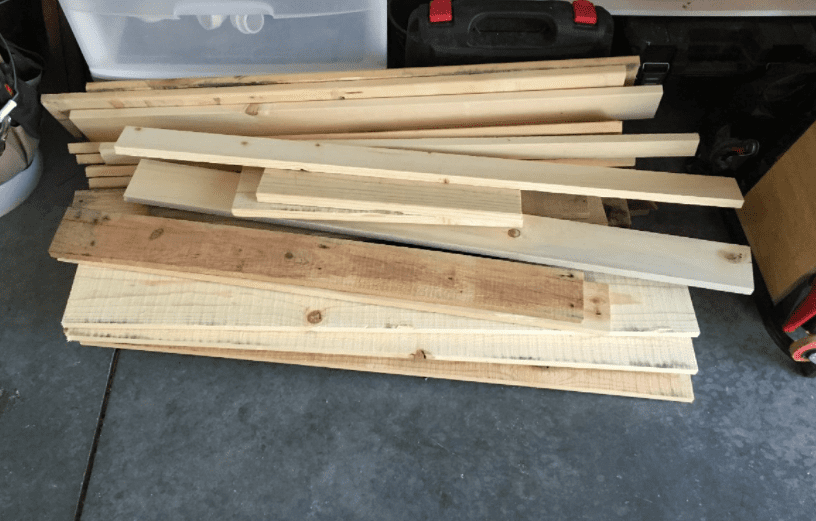
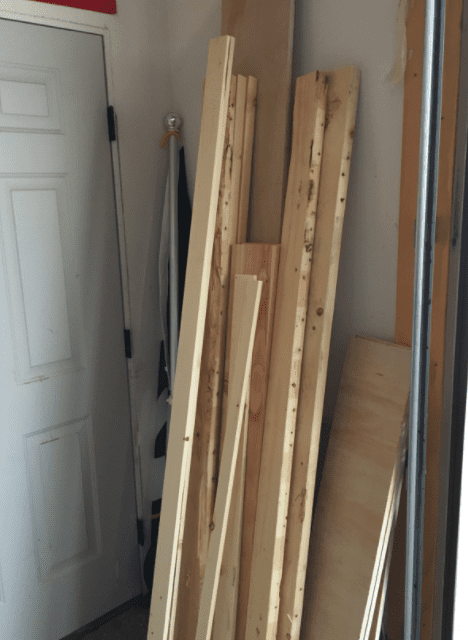
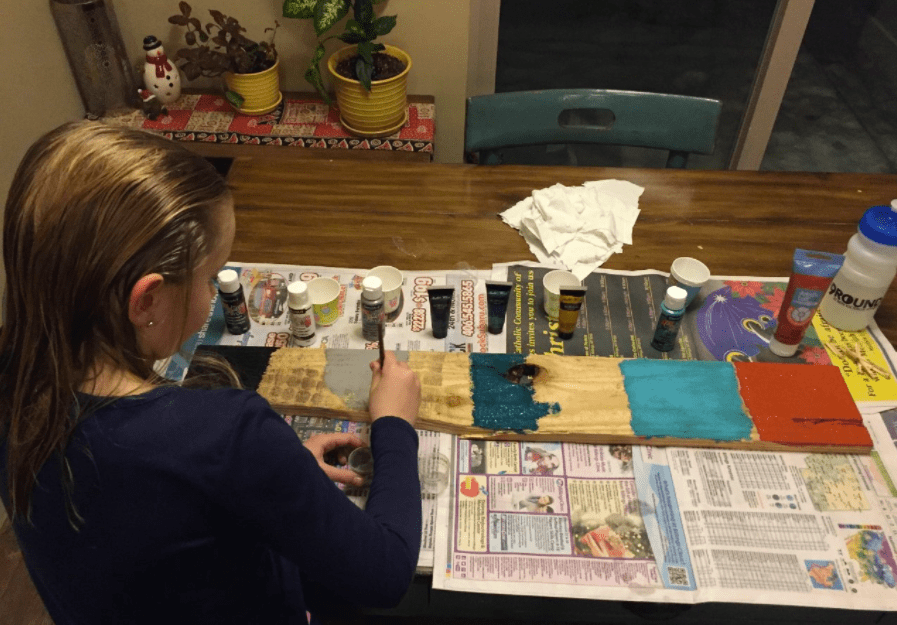
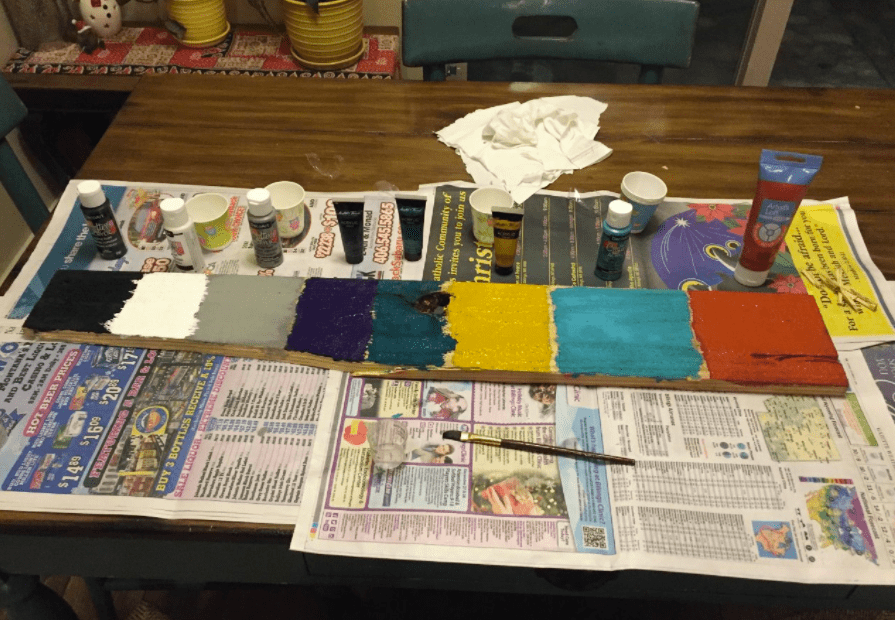
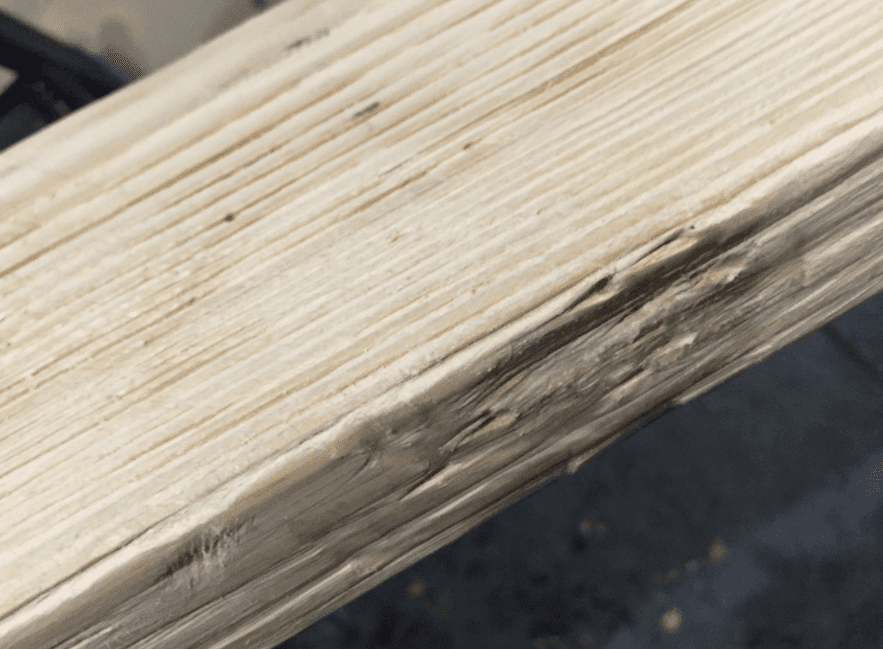
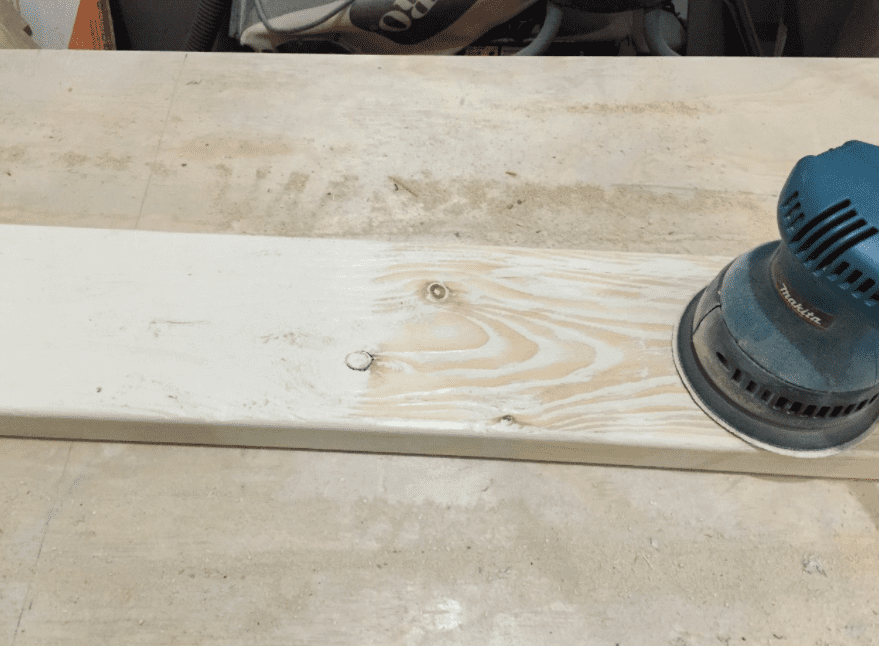
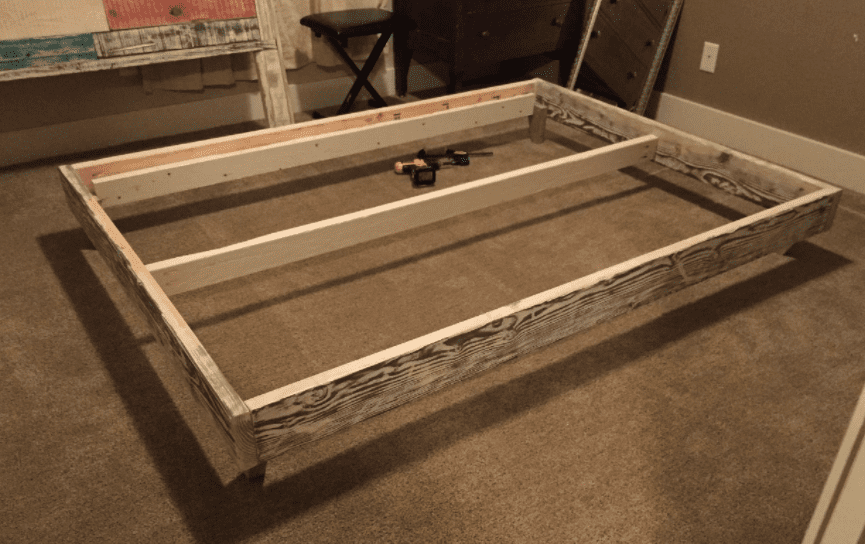
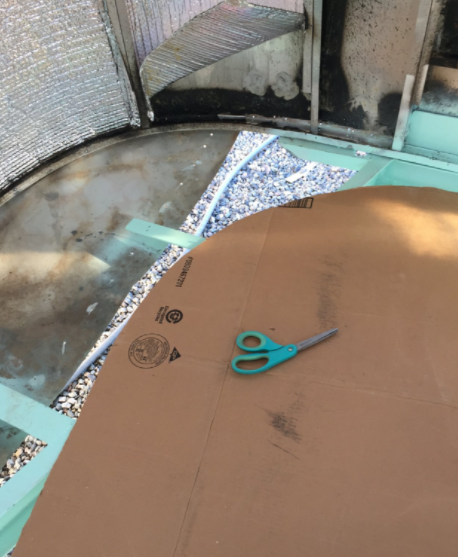
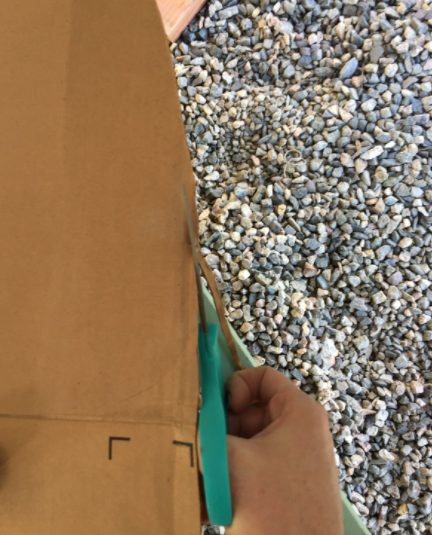
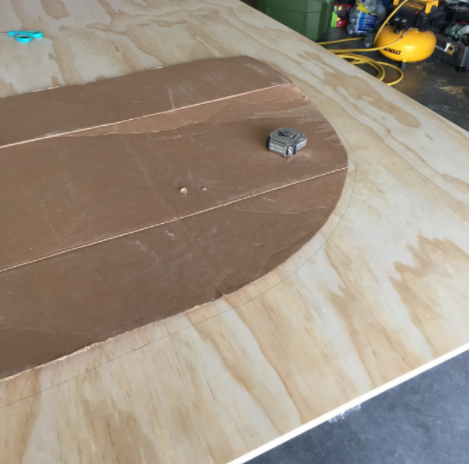
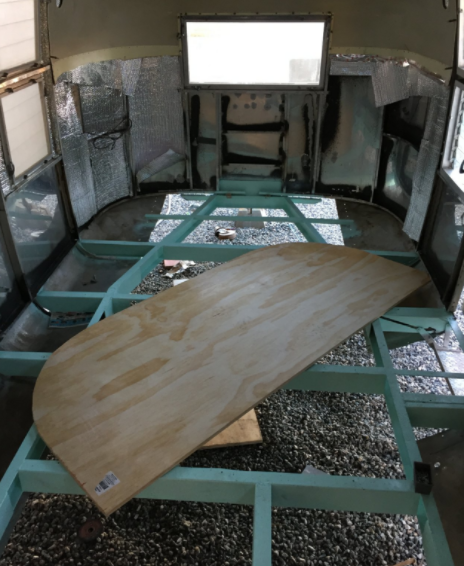
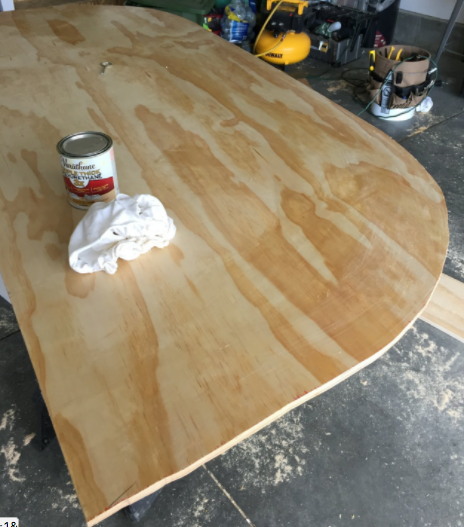
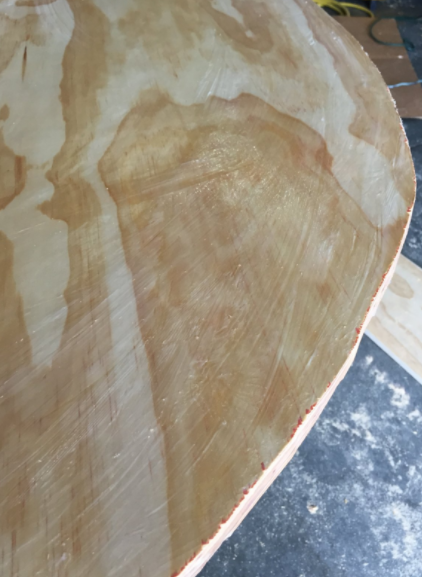
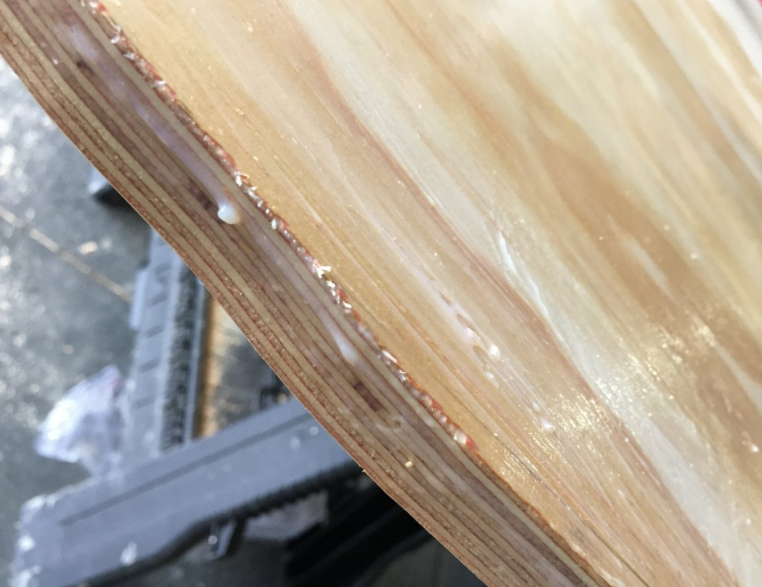
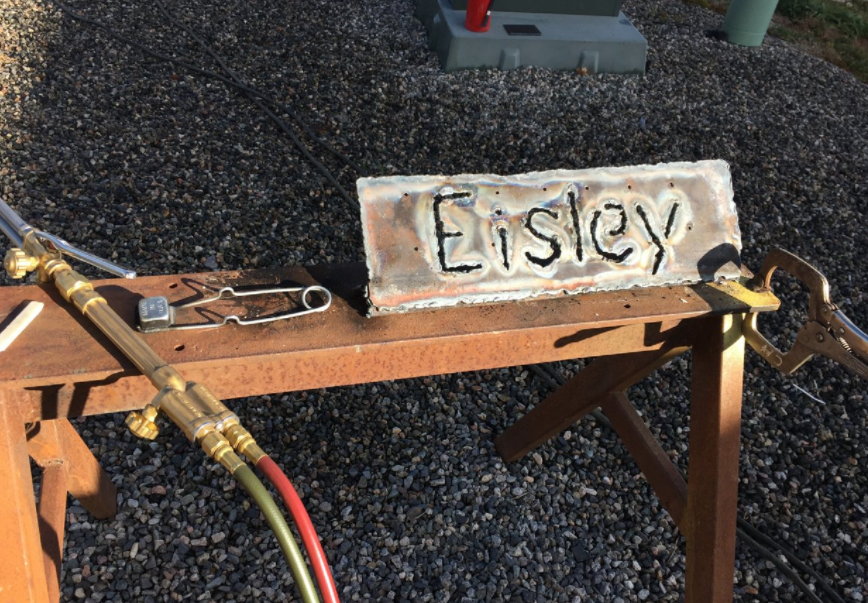
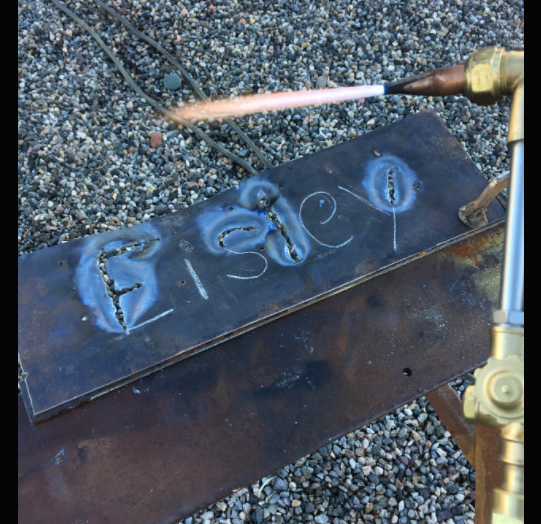
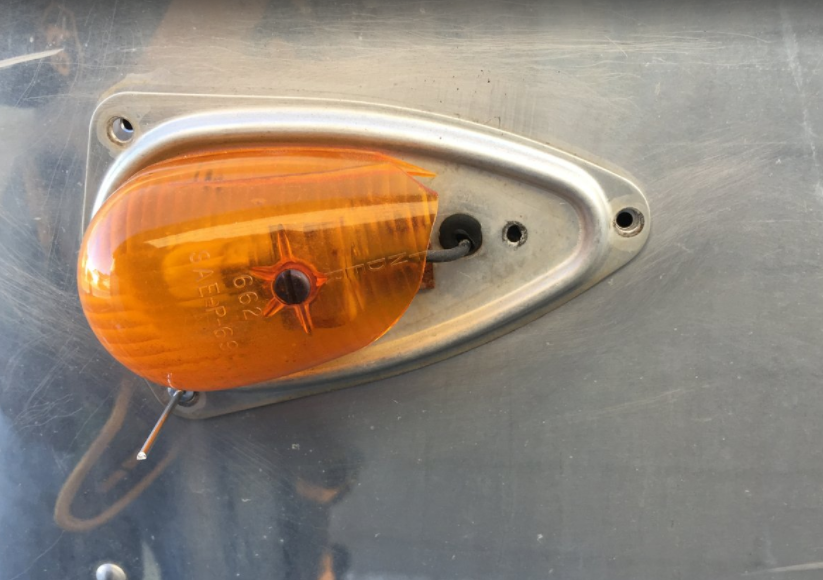
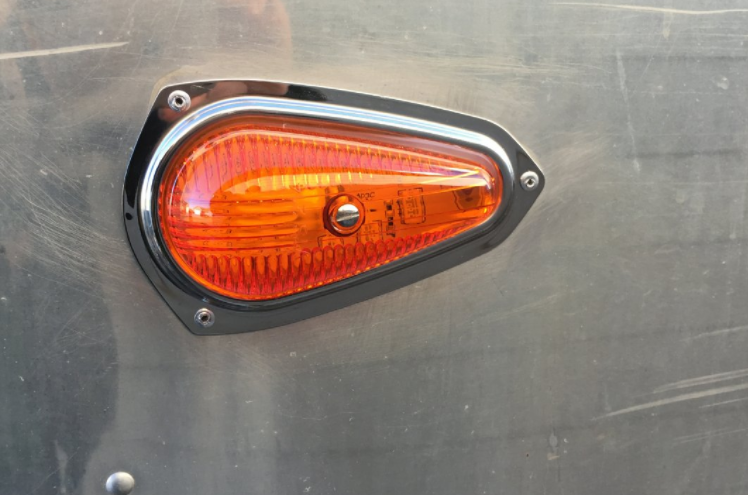
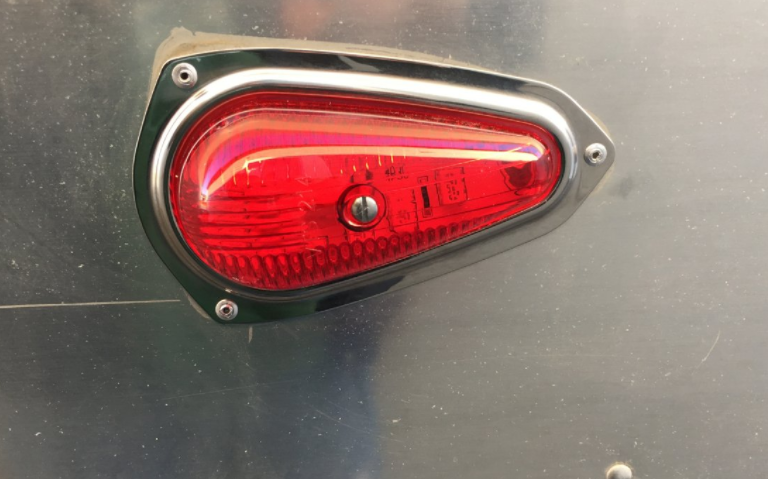
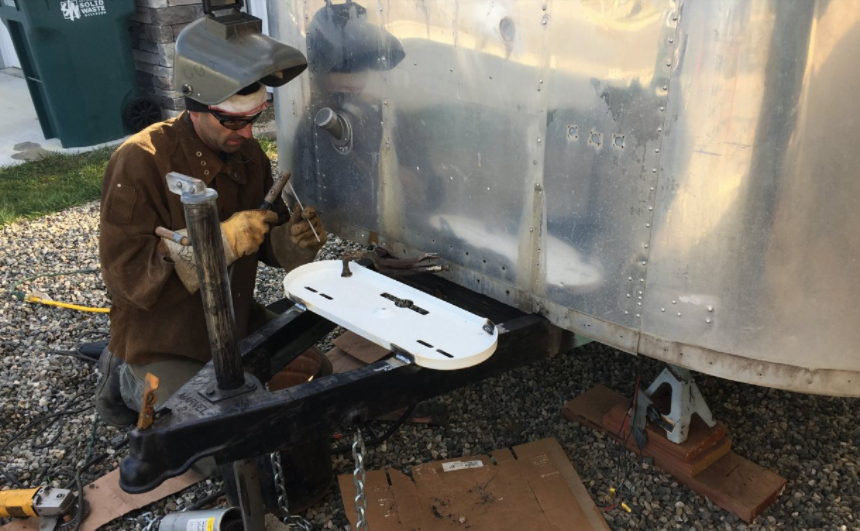
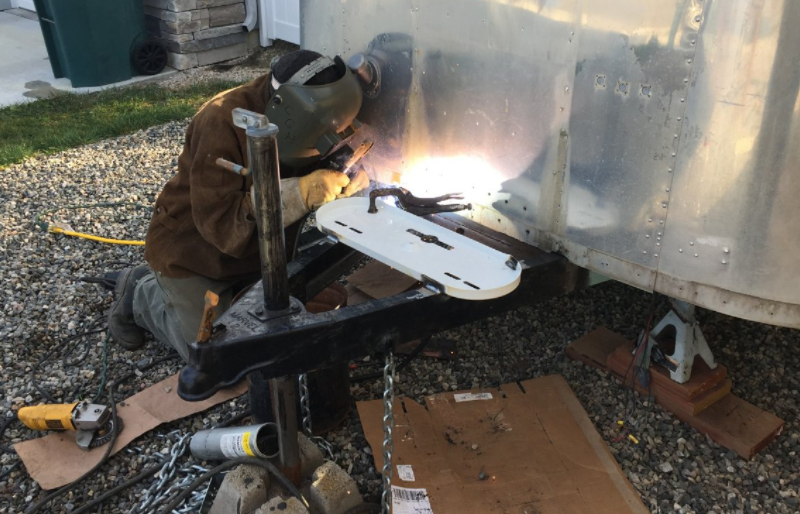
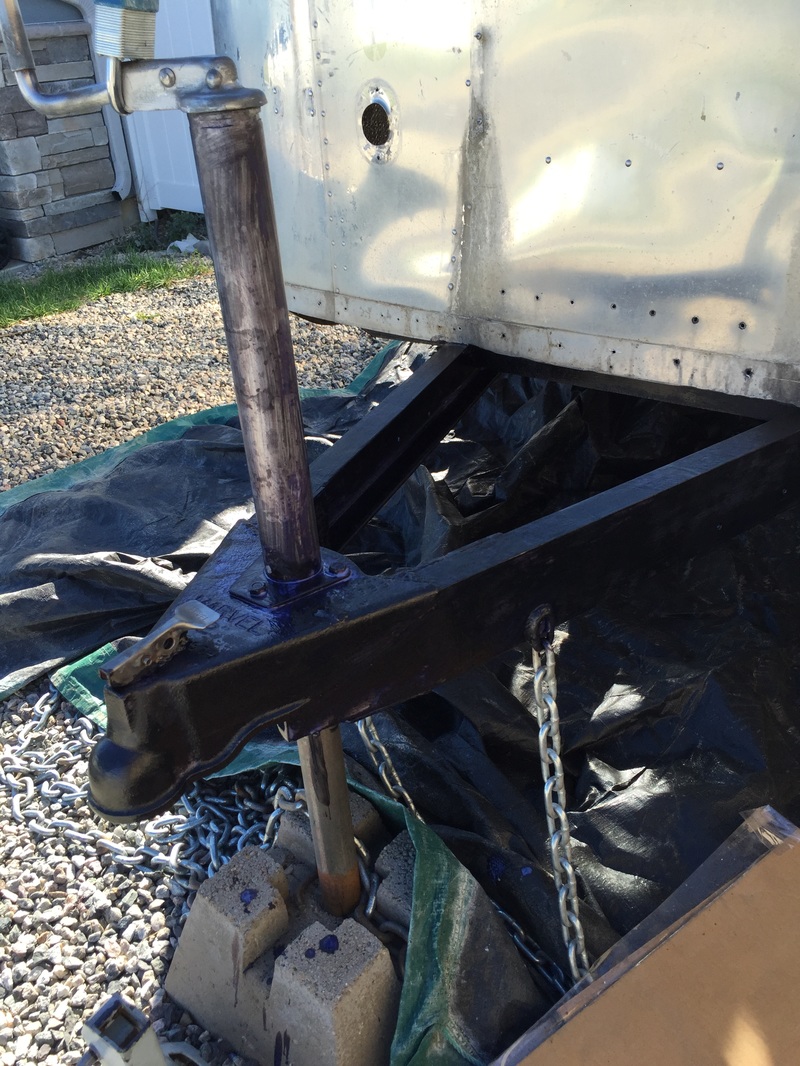
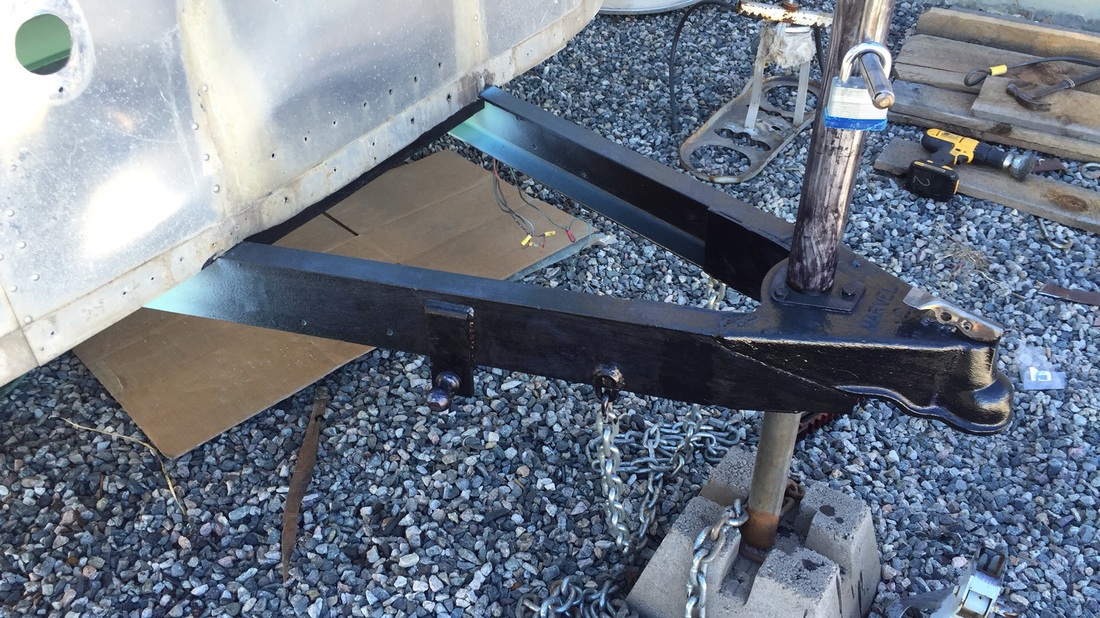
Since my last post about the new subfloor, the weather in MT has made working on Eisley (the name of my Airstream) less desireable. Over the last month we've had 29 inches of new snow. The temperature has dipped below -20°F for multiple days; today's balmy high was 5°F. So this post is off-topic, as my work has been off-topic. My extended family was planning on coming to town over Christmas and our guest room lacked a bed. So I went out to my stack of pallets (which were a lot more snowy than this!) and made them into a bed. Here's how: First I ripped the pallets apart with a table saw. The bulk of the lumber, headboard slats and the 2x4s for the bedframe, came from the pallets. It was pretty easy using my circular saw. Once the pallets were torn apart, I got help with color from our resident artist. My daughter and I made one of the broken pallet pieces into our test board. We used regular acrylic-latex paint (your typical indoor wall paint and/craft paint) and painted it on thick. The trick is to really get the paint into the low spots on the rough wood. You can even thin the paint a little, if needed. (I only ended up thinning a few colors that I didn't quite have enough of for the whole project.) After the paint dried, I sanded the board with 60-grit sandpaper and my orbital sander. This removes the paint from the high spots and exposes bare wood for staining. Along the length of the board, so that it overlapped each paint color, we tested two different stains and left the center natural. The homemade stain was our favorite of the three treatments. It is really easy to make and totally wild to use. Take a glass ball jar (or whatever) and put in one piece of fine steel wool (I used 0000). I pulled it apart and covered it with two cups-ish of white vinegar. The crazy part of this stain is that its darkness totally depends on how long you leave the steel wool in the vinegar. I left it in for about 4 hours for this bed, which is really light. From 4-12 hours the stain ends up being shades of grey, beyond that the stain becomes shades of brown. Here's a great youtube video about it. In case you don't watch the video, just know that the stain takes time to develop after you wet the wood with it. Come back a day later and it looks totally different. Next I bought the few pieces of lumber that the pallets could not provide. (However, I spent less than $50 and the bulk of the lumber came from the pallets!! Just sayin.) I bought 2x6s for the bedframe support, cheap furring strips for trim, and some molding. The two peices of molding were, by far, the most expensive lumber. I should have gone to the Habitat restore for it, but I was cruched for time. I bet I could have halved this lumber cost, if I had. The problem with new wood is that it has no character compared to the rugged pallets. So I took matters into my own hands. I used my angle grinder with a wire attachment and sanded (ground?) out the soft wood. It left those awesome ridges in the middle pic above. Then I imagined a story for each piece of wood, some spots got banged up with a hammer, some got extra nail holes or deep scratches. Every new piece got this treatment, even the trim. I really thought I was going too far, but in the end it was just enough. I think it would be hard to add too much texture. Next I painted my boards. The headboard pieces each got a color and the frame/trim got white. From here, it was really basic carpentry. I put the headboard together, stained it as a unit with the vinegar/steel wool mixture and finally sealed it with several coats of polycrylic. I did stain/seal the frame pieces separately before assembling them. Also, I used a matt finish because I wanted it to look weathered, not shiny. If you'd like plans and dimension for the bed, you can find them at www.ana-white.com. It is a great site for free woodworking plans. I have not been totally idle in my Airstream work. Next time I'll update you on the new progress there. Yellow snakes are invading! 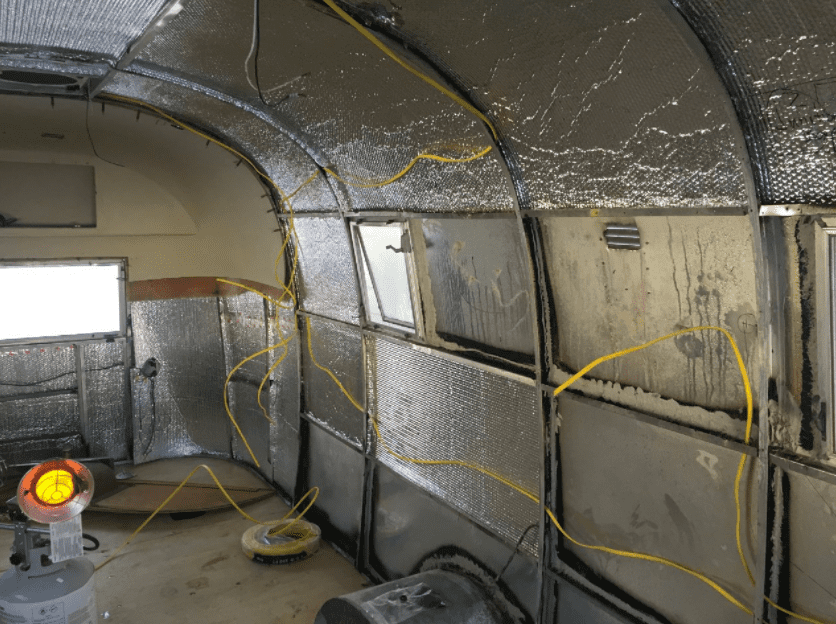 Today I did some dancing! It was every bit as (un)graceful as you're imagining. But I couldn't help myself. I finally have a floor! A whole floor!! Do you know how long I've waited for this day?!?! 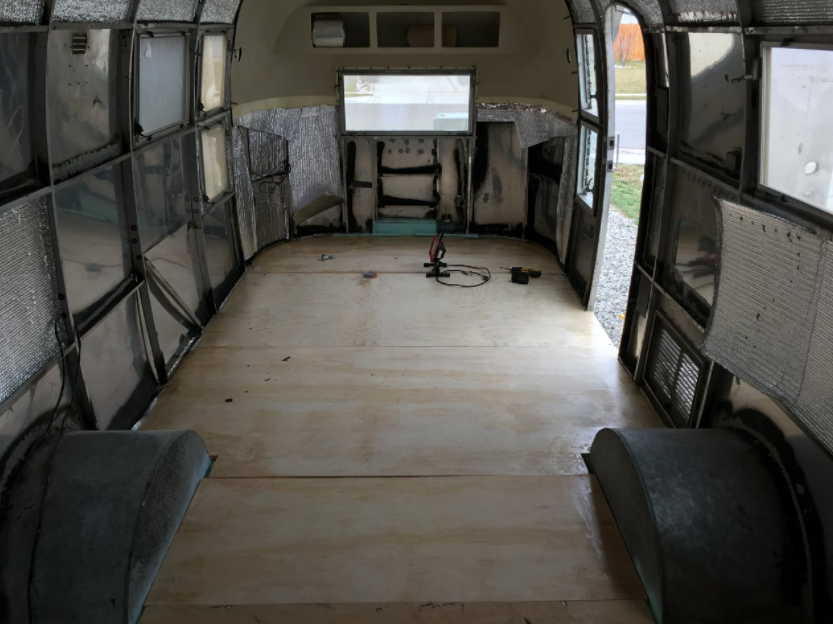 Granted the floor is not secured, which is why you can see the uneven edges of the plywood. But once I bolt the four new panels down, there will be almost no visible seam. So here's how I did it, just like last time: First, I got out the cardboard template that I used on the back half. I assumed that Airstream, in an effort to make things easier for everyone, used the same curve in the front and back. Fortunately, it was very close. I trimmed off a small amount and had a working template in about 10 minutes. From there, I transferred the curve to a piece of plywood with the rest of my measurements and cut. Let me pause and tell you about the plywood itself. Lots of folks have lots of ideas about what to use for restoring Airstream floors. Some people swear by marine-grade plywood ($$) because it has no internal voids. This means less to rot, less trouble securing it to the trailer, and better piece of mind. Some even go so far as to use composite ($$$) material, which will never rot. I found a really quality board at my orange box store. I think it was cheaper when I did the other side, but these panels were $35 per sheet. For reference, marine-grade plywood can be about $75-$100 per sheet. The sheets I used have been perfect. Not cheap, but not nearly so expensive. Next, I coated the edges with triple-thick polyurethane to give it some protection against rot. It's probably better to use spar-urethane or something tougher. But this poly was easy to use and seemed to coat very well. I wasn't going for pretty, either. I used a rag and glopped it on. That's a technical term. I figured thicker is better. As each panel dried enough to handle, I carefully placed it in. And by "carefully placed" I mean I beat it with a mallet until my wood block shattered. The walls flex, so I could get the wood roughly in place. But getting each piece into final position took a ton of careful bashing. But, it ended well: 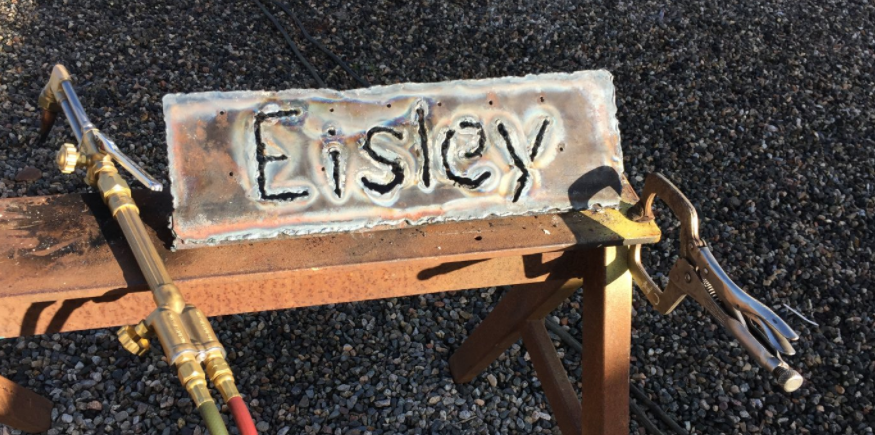 The former front brace plate, cut out and now a decoration. I finally decided on a name, but you'll need to follow me down a geeky rabbit-trail. I'll write that trail at the end of this post, because it's so geeky. If you make it that far, it's your own fault! Anyway, I made the sign above with the cutting torch as Cory was inside the trailer welding. I wasn't planning on doing any more welding, but do you remember that ball-hitch from the last post? I took a few pictures and sent them into The VAP. The VAP gave me some advice that changed that plan. If you don't know what The VAP is, it's because you're not in the Airstream world. It is an acronym for the Vintage Airstream Podcast. The VAP is like Car Talk on NPR, but for vintage airstreams.  Anyway, I've sent in a number of questions before and they are amazingly helpful, so I sent this picture in asking what the hitch was for: 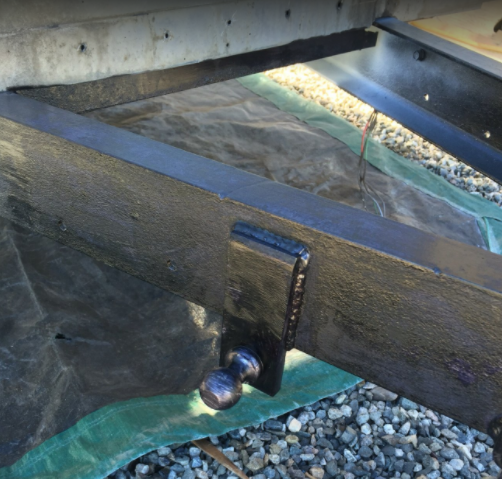 According to Tim Shepherd and Colin Hyde (the two gurus from The VAP), the hitch above is part of a anti-sway bar. A few readers of this blog told me the same thing! But The VAP gurus noticed something much more ominous in the picture. 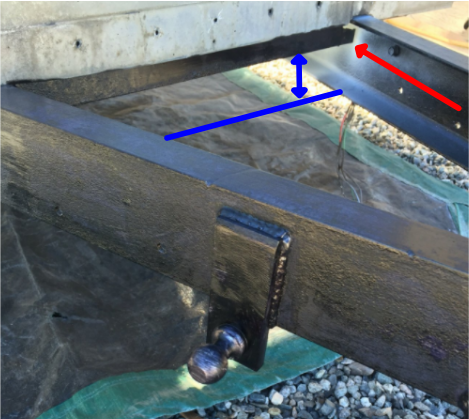 In the photo above, the red arrow points to the most forward crossmember that braces the A-frame. In some Airstreams, mine being one, that crossmember is just L-shaped angle iron. It needs to be the full height of the frame itself (the blue lines I put in). They said there is a real possibility that the frame could bend on an aggressive driveway or unlucky twist in the frame. What a catch! I was just about to close up the belly. Well, Eisley (see, using the new name!) is in too many pieces to be rolled anywhere, so I rented a gas-powered welder and Cory came over. I still pinch myself at my good luck of having a neighbor and friend that is not only a welder, but a welding engineer too. He's smart, meticulous and fun to be around. We made a day of it. I mostly was his assistant, but I puttered when there was nothing I could do to help him. So while he welded, I made the Eisley sign: I replaced the broken marker lights with fancy new LED lights: And I began to work on patching this hole in the streetside lower panel: 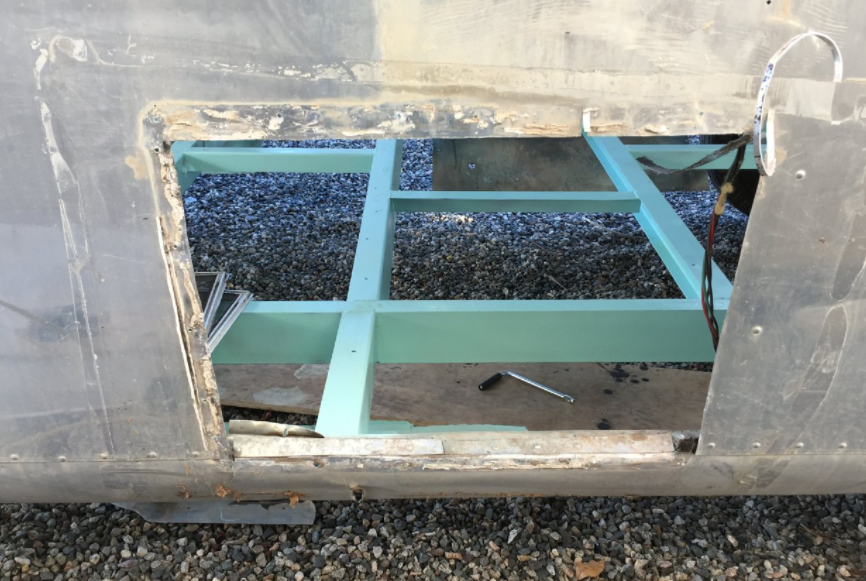 Here's a few pictures of Cory welding: I missed my opportunity to get a pic of him working on the main issue. But the results are below. In the first pic, you can see the short angle iron brace. In the second picture, the new cross brace is welded in place (it's not painted yet). It is made out of the same channel iron as the frame itself. See how much taller the new brace is? The new backer plate is beefed up, too. My next step is painting the last part of the frame. Next, I'll close up the belly pan up front and seal it. Then it will be a few electrical runs, insulation in the belly, and finally, FINALLY, a finished subfloor.
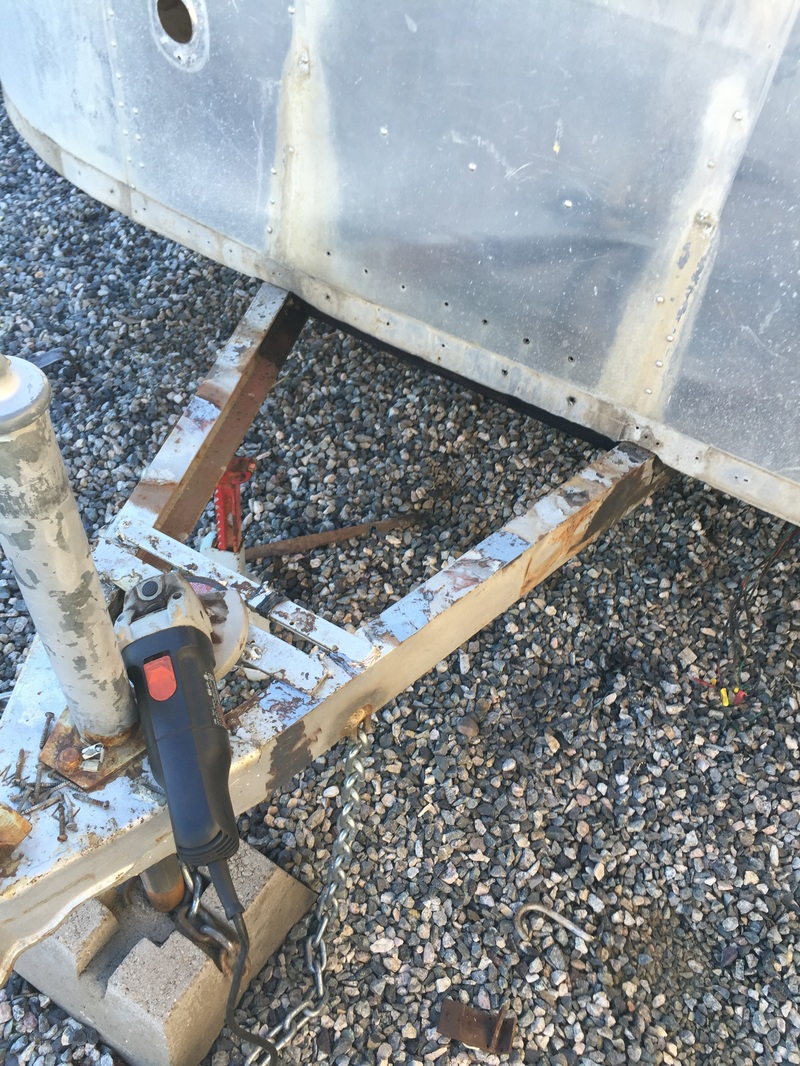
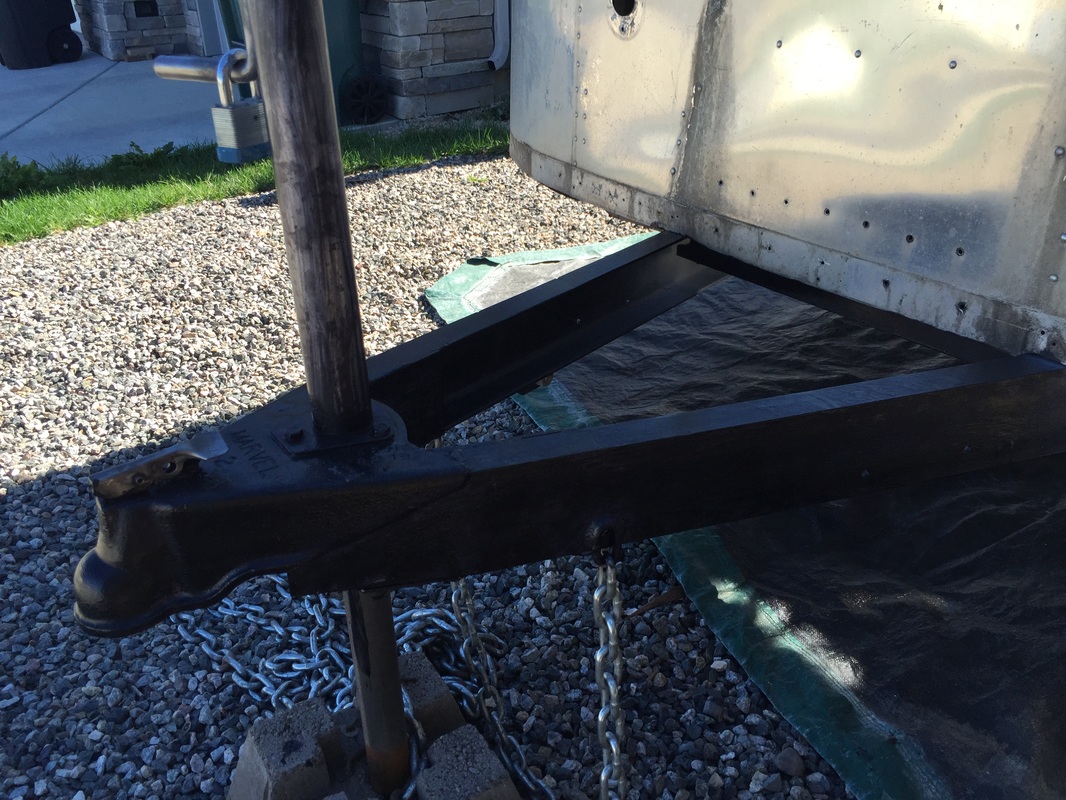
*In the first (original) Star Wars, Luke and Obi-Wan meet Han Solo and Chewbacca in a seedy bar as they are trying to leave Tatooine. The bar's name is Chalmun's Cantina, but none of that seemed like a good name. My family and friends were partial to naming our Airstream The Aluminum Falcon, but the Millennium Falcon is too fantastic. I could never quite get on board with so grand a name. The bar our heroes met in is in a city called Mos Eisley. Obi-Wan says, "You will never find a more wretched hive of scum and villany." Sara didn't like that description, so I dropped the "Mos" and it became a nice soft name. **Han shot first. I tackled two jobs today. First, I primed and painted the frame. The Corroseal had hardened nicely over the last two weeks (it only needs 24 hours) and made a very cool jet-black finish. Below, I started a little back in time in photos, just so you could see the process. This spans from early August to today in photos of the frame: I love the final color: 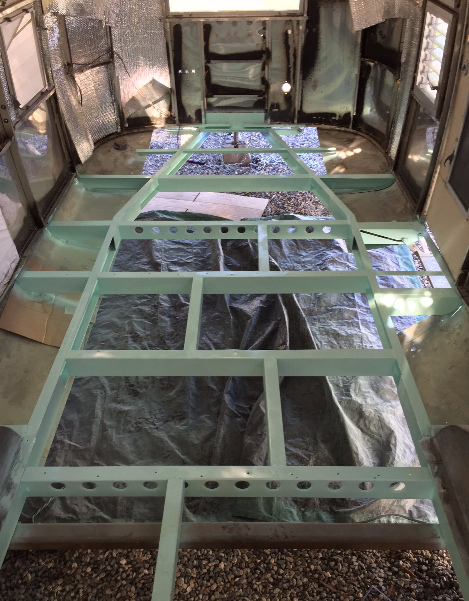 Finished! I really love the transformation from the rusting, nasty subfloor to the clean and painted frame. It's getting there! Secondly, I attacked the cluttered hitch receiver. I took off the propane tank holder - I'll need to put a new one on, but this one was ugly and rusted. There were 6 random hooks welded to the frame -- clearly done by someone who liked to weld as a standard solution to any problem. All the welds were messy, too. After taking all of those off, I applied Corroseal. 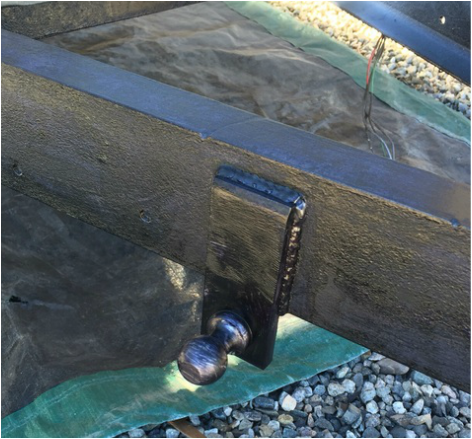 Lastly, is there anyone out there that recognizes a use for this thing? It is attached to the side of the A-frame, which is a very odd place for a ball hitch.
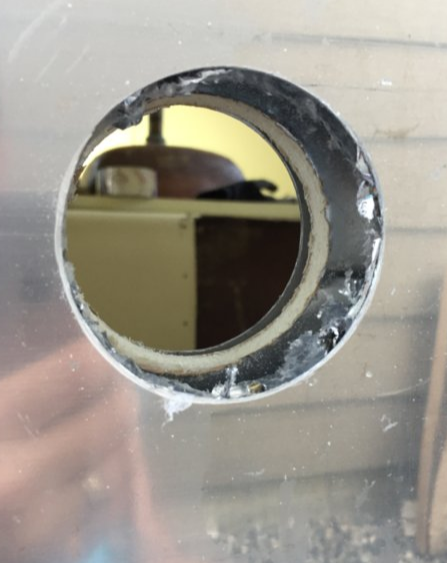
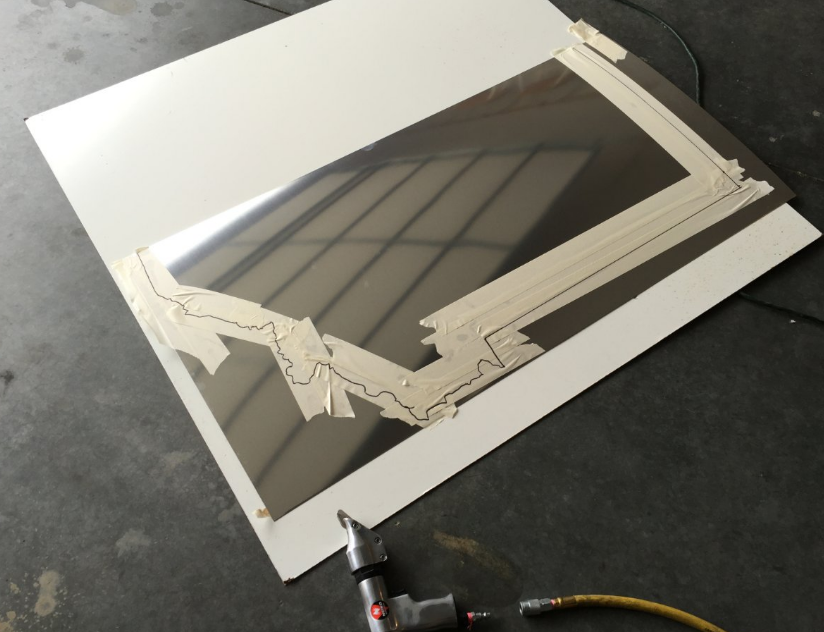
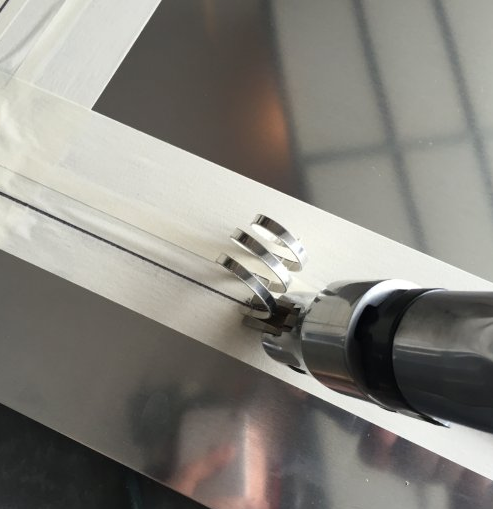
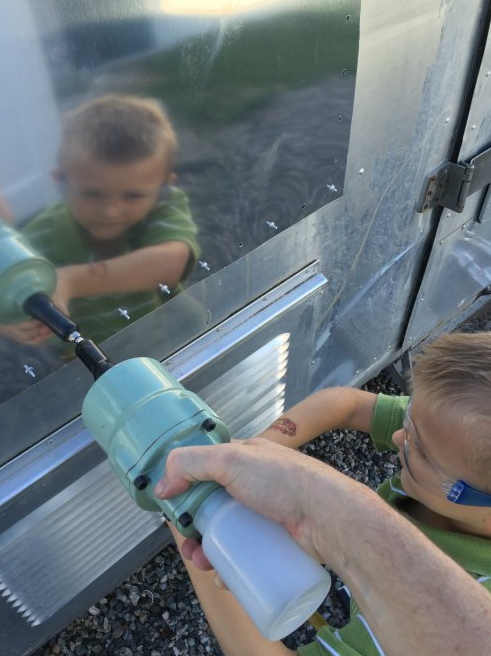
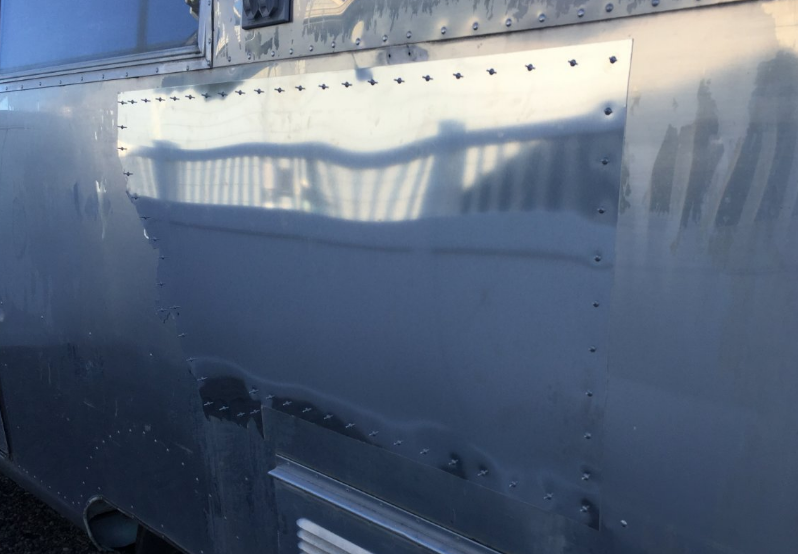
If so, leave a comment about it below! Otherwise, it's a goner. I'll take it off next time before painting. It was hands-down the most nicely welded attachment of the bunch, though. So I may do some research. This week I made me some 406 art: 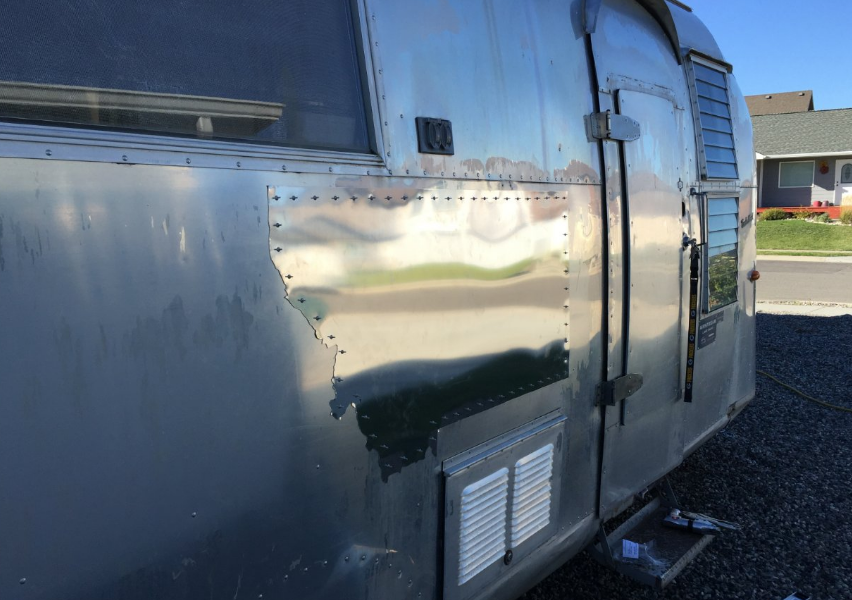 On Friday, it seemed like a rainy weekend in the making. It turned out pretty nice, but since it looked overcast, I decided not not paint the frame. I've had this idea ruminating about a 406 patch on the outside of the skin. It needed a patch, so rather than make it square, I decided to make it artistic. Here's what I did: On the old photo below, the top grill next to the door was not original and not done well. Plus the door handle had repeatedly slammed into the skin when the door caught the wind, creating a large dent. The bottom grill needs love, but it is original, so It will stay.. 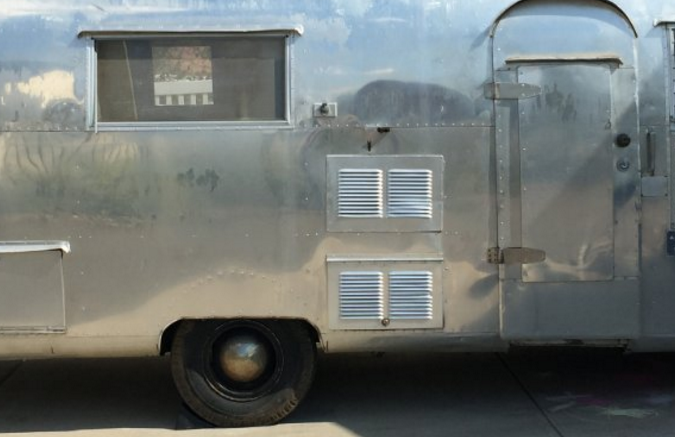 So first I needed to make the patch itself. Sara found a $10 projector at a garage sale a few months ago. It only runs for about 15 minutes before overheating, but that was plenty of time. I found a map and projected it on my aluminum in my darkened garage. 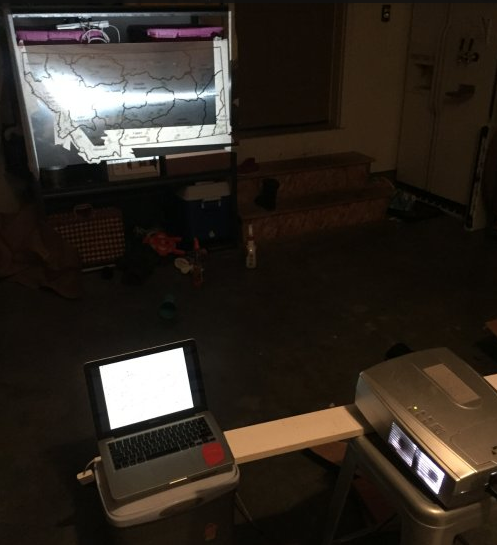 I put masking tape down and used sharpie to trace the pattern. It pulled double duty - easier to mark on and protection against scratches. After I had the pattern, I cut the straight borders of Montana with my pneumatic shears. However, it's impossible to make curves with those. I tried just about every tool I owned to cut curves (first on scrap metal) like the western border of Montana. In the end the scroll saw worked the best. After that I had a helper. We drilled the holes for the future rivets and removed the old grate. Sorry about the gratuitous photos, but I'm a dad and his face makes my day. Under the grate, the hole was rough and jagged. So I evened it out with my pneumatic shears and and cleaned it with steel wool. After that, we put the new patch up on the side, drilled the holes and filled them with olympic rivets. Eventually, I'll need to shave down the rivets to match the look of bucked rivets. But that's for another day. |
AuthorI'm not an Airstream Jedi, yet. Airstream Jedi would have sounded presumptuous, like I know what I'm doing. That couldn't be further from the truth. Padawan is a title I can hope to live up to. Favorite Links:Knots Per Hour
My friend Mike is building an airplane. Check it out. Archives
August 2018
Categories |


 RSS Feed
